


Sublimation projects for UK classrooms: practical ideas
TL;DR:
- Selecting sublimation projects for education requires careful consideration of safety, substrate compatibility, and skill level to ensure achievable and meaningful learning experiences.
- Overlooking safety protocols, such as ventilation and PPE, can pose serious health risks, emphasizing the importance of structured workflows and safety standards in classrooms.
Selecting sublimation projects for a classroom or creative workshop involves far more than picking something that looks impressive. You need projects that are safe for students, achievable within a lesson or session, aligned with available equipment, and genuinely educational. With the right groundwork, sublimation can deliver memorable, hands-on learning experiences that connect design skills, material science, and digital creativity. This guide walks through how to choose projects wisely, which specific ideas work best in educational settings, and how to manage the safety protocols that make the whole process sustainable and responsible.
Table of Contents
- How to choose sublimation projects for educational settings
- Beginner-friendly sublimation project examples
- Safety and ventilation: Essential protocols for classroom sublimation
- Classroom workflow comparison: Substrate and process checklist
- Why safety and workflow matter more than ‘just craft’
- Explore UK sublimation supplies for educational workshops
- Frequently asked questions
Key Takeaways
| Point | Details |
|---|---|
| Project safety essentials | Ventilation and PPE are critical for safe classroom sublimation work. |
| Beginner project options | Pencil cases, tote bags, and badges are top picks for school-friendly sublimation. |
| Workflow standardisation | Mirrored prints and preset heat timings boost consistency and results. |
| Supplier reliability | UK-based suppliers simplify sourcing blanks for educational projects. |
| Teaching outcomes | Sublimation projects blend creativity with practical STEM learning. |
How to choose sublimation projects for educational settings
Not every sublimation project translates well into a classroom. A product that is straightforward for an experienced maker in a private studio can become a safety or logistics nightmare when thirty students are involved. Before committing to any project, work through a consistent set of criteria.
Substrate compatibility comes first. Sublimation ink bonds permanently to polyester fibres and specially coated surfaces. Items like 100% cotton garments will not hold the image. For classroom use, you want substrates that are forgiving, readily available, and clearly labelled with their polyester content. A sublimation blanks guide can help you understand exactly which products are confirmed compatible, which matters enormously when you are ordering in volume for a whole class.
Project complexity needs to match the age group and skill level. A beginner project workflow, such as applying heat tape, aligning the design, and pressing it onto a polyester pencil case, gives younger students a manageable sequence of steps with a clear, satisfying outcome. More complex projects, like curved mugs or allover garment prints, introduce variables that can trip up even adult learners.
Safety considerations deserve their own dedicated planning stage, which we cover in detail later. For now, the key point is that the equipment you select and the space you work in need to be assessed before students arrive, not on the day.
Here is a checklist of criteria to run through for every new project idea:
- Does the substrate contain at least 80% polyester or have a confirmed sublimation coating?
- Can the heat press reach and maintain the required temperature consistently?
- Is the workflow achievable in the available session time, including setup and clean-down?
- Are there age-appropriate handling risks to account for, such as hot surfaces or fumes?
- Is the design creation stage (digital or hand-drawn scan) within the students’ capability?
Pro Tip: Run a test press on a spare blank before the session begins. Colours and timing can shift between batches, and a failed classroom demo is a confidence killer for both students and the facilitator.
Getting the transfer process right from the outset prevents the most common classroom frustrations: washed-out colours, blurry edges, and misaligned prints.
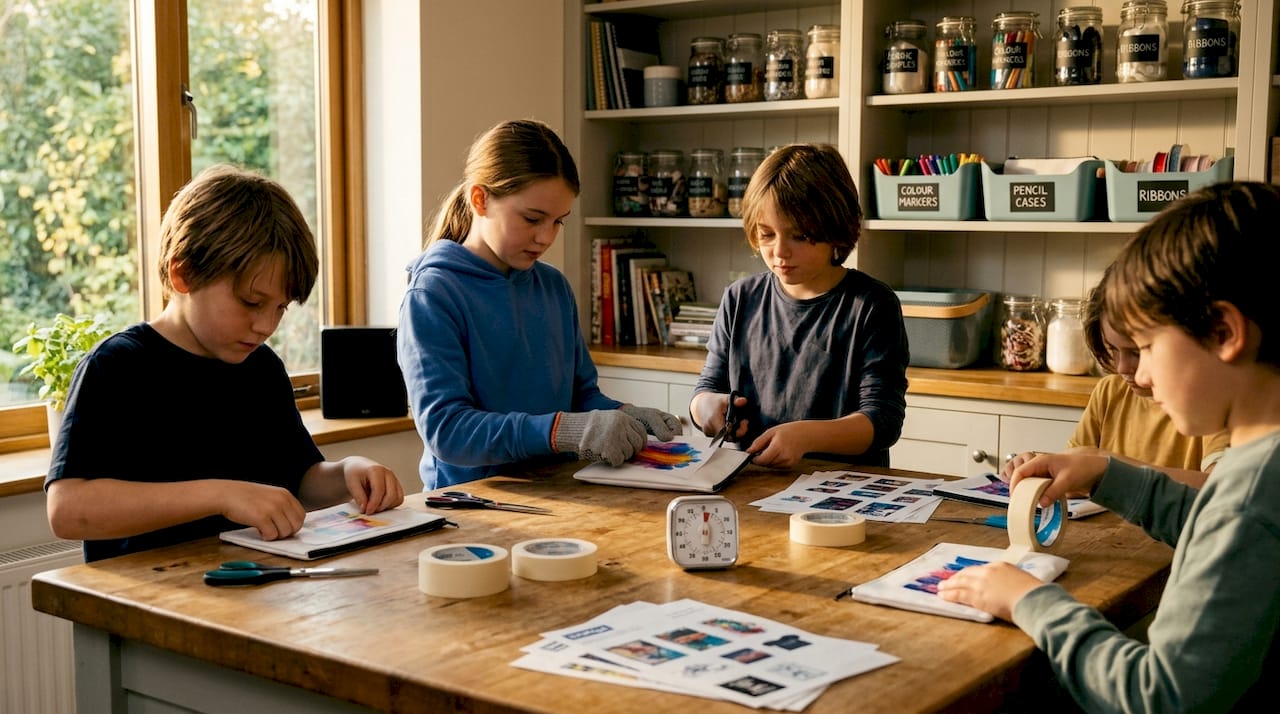
Beginner-friendly sublimation project examples
With clear selection criteria in mind, here are practical sublimation project examples, each with educator-friendly workflows and material lists.
The following project types are particularly well suited to educational settings:
- Polyester pencil cases — Students design a graphic, print it mirrored onto sublimation paper, align it carefully on the case, secure with heat tape, and press. The result is personal, useful, and durable. This works well from Key Stage 2 upwards.
- Sublimation tote bags — 100% polyester tote bags accept full-colour prints and are flat, making alignment much easier. They are also relatively inexpensive, which matters when managing project budgets for a whole group.
- T-shirts and aprons — These are popular in secondary and further education settings. Students learn about garment construction alongside print placement. As documented by Hackspace Manchester, t-shirts, aprons, and other fabric substrates are among the most commonly used items in shared workshop environments, precisely because the workflow is repeatable and teachable.
- Ceramic mugs (coated) — Mugs require a cylindrical heat press attachment. They are better suited to older students or post-16 settings. The wow factor is high, but the complexity increases with curved surfaces.
- MDF badges — Name badges, pin badges, and decorative badges using MDF sublimation blanks are ideal for younger students. They are small, quick to press, and allow students to focus on the design stage rather than wrestling with larger substrates.
- Keyrings and coasters — Flat, small, and quick. These work as excellent introductory projects because the press time is short and the results are immediately visible.
Typical materials per student for a tote bag project:
- One polyester tote bag blank
- Sublimation paper (A4 typically sufficient)
- Printed, mirrored design in sublimation ink
- Heat-resistant tape
- Protective sheet (silicone or Teflon)
Pro Tip: Always print designs in mirror image before pressing. This is a step that students consistently forget. Build it into your digital design checklist as a mandatory final step. The step-by-step printing guidance on our blog explains this in detail, with clear visuals that you can share directly with students.
Age group guidance:
- Key Stage 2 (ages 7 to 11): Pencil cases, flat badges, keyrings under close supervision
- Key Stage 3 and 4 (ages 11 to 16): Tote bags, aprons, simple garment sections
- Post-16 and adult learners: Mugs, t-shirts, multi-element designs
Knowing which substrate to pair with which age group makes the equipment setup basics much simpler, because you can standardise press settings rather than constantly adjusting between projects.
Safety and ventilation: Essential protocols for classroom sublimation
Before diving deeper into classroom workflows, it is crucial to examine the safety elements, especially ventilation and chemical exposure control.
Sublimation ink, when heated, releases volatile organic compounds (VOCs) and other vapours into the surrounding air. In a private studio with good airflow, this is manageable. In a classroom with twenty or more students in a confined space, it requires proper planning. As safety guidance makes clear, sublimation printing involves real chemical exposure risks from heated inks, and these should be treated with the same seriousness as any COSHH-regulated activity in a school workshop.
Sublimation in educational settings should be treated as a regulated technical activity involving chemical exposure, not simply as a low-risk craft session. Ventilation, PPE, and staff training are non-negotiable components, not optional extras.
Essential safety protocols for classroom sublimation:
- Ventilation: Open windows and use extractor fans rated for chemical fumes. Do not press in a sealed or poorly ventilated room. Where possible, position the heat press near a window or dedicated extraction point.
- PPE: Heat-resistant gloves are required when handling the press platen or freshly pressed items. Consider safety goggles when working with powders or liquids, and advise on appropriate clothing coverage.
- COSHH documentation: Schools and colleges in England, Scotland, Wales, and Northern Ireland are required to comply with COSHH (Control of Substances Hazardous to Health) regulations. Sublimation inks should be included in your risk assessments. Request safety data sheets from your ink supplier.
- Student briefing: Before any session, students need a safety briefing that covers the heat press danger zone, correct use of PPE, and what to do if something goes wrong.
- Staff training: Only trained staff should operate the heat press directly. Students should be supervised closely and only handle cool, completed items.
The maintenance protocols for your equipment also play a safety role. A poorly maintained press can overheat, produce inconsistent results, or develop electrical faults. Regular checks protect both equipment and people.
Pro Tip: Create a laminated safety card that lives next to the heat press at all times. Include press temperature, timing, emergency stop procedure, and PPE requirements. This normalises safety as part of the process, rather than something students tune out during a verbal briefing.
When choosing equipment for educational use, prioritise models with digital temperature displays, auto-shut-off functions, and stable platen locking mechanisms. These features reduce the chance of operator error in busy workshop environments. The essential safety kit needed for classroom sublimation includes more than just the press itself.
Classroom workflow comparison: Substrate and process checklist
To simplify planning and classroom management, comparing workflows and substrate choices helps you pick the best project for your unique teaching situation. The table below provides a side-by-side view of the most common educational sublimation projects, matched to key workflow considerations.
| Substrate | Press temp | Press time | Mirror required | Age suitability | Complexity |
|---|---|---|---|---|---|
| Polyester pencil case | 190°C | 40 seconds | Yes | KS2 and above | Low |
| Polyester tote bag | 190°C | 45 seconds | Yes | KS2 and above | Low |
| Polyester t-shirt | 200°C | 50 seconds | Yes | KS3 and above | Medium |
| Apron (polyester) | 200°C | 50 seconds | Yes | KS3 and above | Medium |
| Coated ceramic mug | 200°C | 180 seconds | Yes | Post-16 | High |
| MDF badge blank | 180°C | 30 seconds | Yes | KS2 and above | Low |
| Polyester coaster | 180°C | 35 seconds | Yes | KS2 and above | Low |
As demonstrated in Hackspace Manchester’s documentation, standardising equipment workflow details, such as mirror settings and preset heat and pressure timing, alongside a clear list of allowed substrates, is what makes sublimation reproducible in a shared workshop environment. Without these standards, sessions quickly become chaotic, with students pressing at different temperatures and producing wildly inconsistent results.
Two further workflow principles are worth building into every session plan. First, pre-load all press settings before students arrive and lock them where possible. Second, create a substrate-specific protocol card for each project type, which any member of staff or an older student helper can follow independently.
For anyone new to the terminology around sublimation equipment, our key terminology guide removes the jargon and explains exactly what each setting and component does. And if you are assembling or expanding your kit, the equipment checklist ensures you do not miss anything essential.
Why safety and workflow matter more than ‘just craft’
There is a tendency in creative education to frame sublimation as an exciting craft activity and leave the technical rigour for a later date. We understand the appeal. The results are vivid, the students are engaged, and the process feels accessible. But this framing can lead to shortcuts that create real risk.
When sublimation is treated as a casual art project, ventilation gets overlooked, PPE becomes optional, and press settings are guessed rather than calibrated. This is precisely why some safety guidance frames classroom sublimation as a chemical exposure problem requiring COSHH-style controls, not as a low-risk activity. The ink chemistry does not change because the setting is educational.
What we have consistently observed is that the most successful educational sublimation programmes are the ones that treat the process with genuine technical respect. When students see that there is a real workflow to follow, with specific temperatures, timing, mirroring requirements, and PPE, they engage more seriously. Sublimation becomes a lesson in process discipline, not just decoration.
Workflow standardisation also supports inclusion. When each step is written down, demonstrated, and checked, students who struggle with open-ended tasks can participate fully. Students with attention to detail often thrive in the calibration and alignment stages. The process structure creates natural differentiation.
The equipment safety guidance we provide is designed with exactly this kind of structured educational environment in mind. Maintaining your equipment properly is not just about print quality. It is about building a reliable, safe workshop that students and staff can trust session after session.
Explore UK sublimation supplies for educational workshops
Once you are ready to start experimenting or upgrading your classroom supplies, finding reliable, educational-grade blanks and materials is the next step.

At SubliBlanks, we supply a wide range of sublimation blanks, equipment, and consumables with no minimum order quantities, which makes us particularly practical for schools, colleges, and workshop facilitators who need to order at the scale of a single class rather than a commercial print run. Our round MDF name badge blanks and rectangle pin badge blanks are especially popular in educational settings because they are low-cost, quick to press, and give students a finished product they can actually use or wear. Browse our full range to find the substrates that suit your programme, your students, and your budget.
Frequently asked questions
What are the safest items for beginner classroom sublimation projects?
Polyester pencil cases, tote bags, and aprons are considered the safest starting points, provided the room is properly ventilated and all participants wear appropriate PPE as outlined in safety guidelines.
How can I manage chemical exposure risks during sublimation workshops?
Use proper ventilation, apply COSHH-style controls for heated ink vapours, and ensure every participant has access to appropriate PPE including heat-resistant gloves before the session begins.
Do students need to mirror their designs before sublimation?
Yes, every design must be printed in mirror image before pressing so the final transferred image reads correctly on the finished substrate.
What age groups are best suited for sublimation projects?
Key Stage 2 and above, where students can follow sequential instructions and handle heat-resistant materials safely under direct adult supervision, with project complexity increasing for older age groups.
Where can I buy sublimation blanks and supplies for my classroom?
SubliBlanks Ltd offers a broad range of ready-to-use sublimation blanks, MDF badges, and workshop supplies with no minimum order requirement, making it straightforward to order exactly what your class needs.


