



What is a packaging workflow for UK print shops?
A packaging workflow is the fixed sequence of steps your team follows to move a finished order from the production bench to a carrier’s hands, every time, without guessing. For a trade print or personalised-goods shop, that means: verify the order, pick the item, inspect it, protect it with cushioning, pack it into the right box, seal it, weigh and measure it, attach the carrier label, run a final QA check, and hand it over for dispatch. UPS recommends at least roughly 5 cm (2 in) of loose cushioning around lightweight items. Royal Mail’s size thresholds mean a parcel slightly over the Small Parcel limit costs significantly more to send. Getting the business case for packaging right from the start saves money on every single order.
Quick workflow checklist:
- Verify order details against the picking list
- Pick and pre-inspect the item for defects
- Choose the correct box size and cushioning
- Protect the item with at least 5 cm of void fill on all sides
- Seal all seams with approved shipping tape
- Weigh and measure the parcel
- Attach the carrier label away from seams
- QA sign-off: seal, label, weight, dimensions
- Hand over to carrier
Key takeaways
A structured packaging workflow reduces damage claims, courier surcharges, and reshipment costs for any UK print or personalised-goods shop.
| Point | Details |
|---|---|
| Follow a fixed sequence | Use the nine-step workflow (verify, pick, protect, pack, seal, weigh, label, QA, dispatch) for every order. |
| Apply 5 cm cushioning | UPS guidance recommends at least 5 cm of void fill on all sides of lightweight items. |
| Use corrugated for courier work | Single-wall corrugated handles most small-parcel shipments; double-wall suits heavy or fragile items. |
| Add one QA checkpoint | A single end-of-line check (seal, label, weight) materially reduces damage claims and reshipments. |
| Source supplies from Subliblanks | Subliblanks supplies packaging consumables and equipment to UK trade shops with no minimum order quantities. |
Table of Contents
- What is a packaging workflow, step by step?
- How do you choose the right box and cushioning materials?
- Packing fragile, liquid, and electronic items
- Sealing, labelling, and carrier compliance in the UK
- What tools and equipment does a trade print shop need?
- Two copyable workflow templates for common order types
- Common packing mistakes and how to fix them
- A trade perspective on tightening your packing line
- Stock your packing station through Subliblanks
- Sources
What is a packaging workflow, step by step?
A repeatable packing sequence is what separates a shop that ships 50 orders a day without damage claims from one that spends Friday afternoons on the phone to couriers.
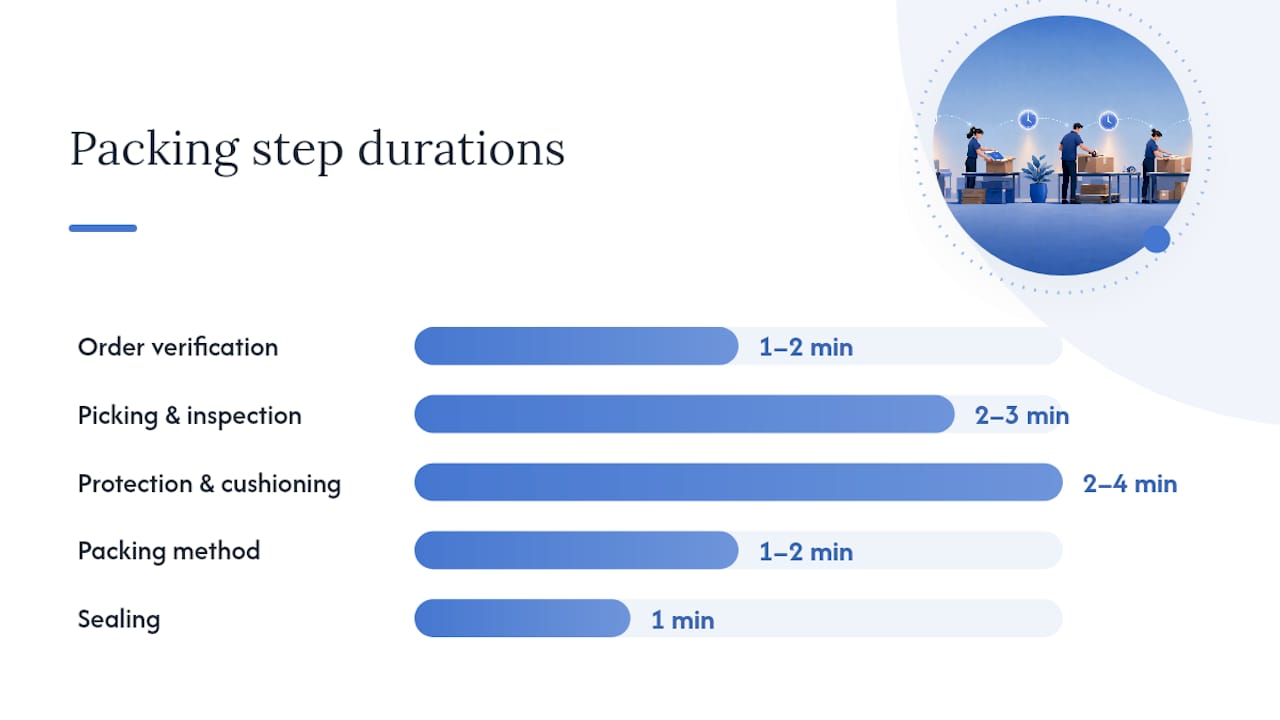
- Order verification (1–2 min): Cross-check the order number, product, quantity, and delivery address against the picking list before touching any packaging. Catching a mismatch here costs nothing; catching it after dispatch costs a reshipment.
- Picking and pre-pack inspection (2–3 min): Pull the item and check it physically. Look for print defects, scratches, or incomplete personalisation. A damaged item that leaves the building is a refund waiting to happen.
- Protection and cushioning (2–4 min): Line the box base with at least 5 cm of your chosen void fill. Bubble wrap, EPS foam, air bags, and crumpled kraft paper are all carrier-accepted options. Place the item centrally, then fill all remaining voids to the same depth on every side.
- Packing method (1–2 min): Single, non-fragile items go into one box. Fragile or liquid items often need the two-box method: inner box packed and sealed, placed inside a larger outer box with its own cushioning layer.
- Sealing (1 min): Apply approved shipping tape along every seam. The H-tape pattern (centre seam plus both ends) is the minimum for a corrugated box. Never use masking tape or parcel string.
- Weighing and dimensioning (1 min): Place the sealed parcel on a bench scale. Record the weight and measure length, width, and height. Check these against your carrier’s size bands before printing the label.
- Labelling (1 min): Print or apply the carrier label on the largest flat face, away from seams and folds. Confirm the barcode is flat, unobscured, and scannable.
- QA sign-off (1 min): One person checks: seals intact, label readable, weight and dimensions within carrier limits, correct address. Sign or initial the picking list.
- Carrier handover: Group parcels by carrier and service. Keep a dispatch record for every order.
For a single item, the total time is roughly 10–15 minutes. A batch of 20 similar items, once your team has a rhythm, runs closer to 5–7 minutes per parcel.
QA pass checklist: all seams sealed with shipping tape; label flat, scannable, not on a seam; weight and dimensions within carrier limits; address matches the order.
How do you choose the right box and cushioning materials?
The box is not just a container. It is the first line of protection and, for personalised goods, often part of the customer’s unboxing experience.
Corrugated board is the preferred choice for couriered and stacked shipments because its fluted construction adds cushioning and compression resistance. Single-wall corrugated handles most small-parcel work. Double-wall is worth the extra cost for heavy ceramics, glass, or anything that will be stacked in a depot. Kraft and rigid board suit eco branding or luxury presentation respectively, but neither is a substitute for corrugated when a parcel is going through a courier network.
Paperboard grades run from 300–600 gsm for retail cartons, and flute profile matters: E-flute is thinner and better for printing directly onto the box, while B-flute gives greater cushioning depth. If you are printing branded boxes, test the flute before committing to a full run.
Sizing rule: the internal dimensions of the box should equal the product dimensions plus at least 5 cm on every side for void fill. An oversized box wastes fill material and lets the item shift in transit; an undersized box compresses the item and voids most carrier damage claims.
| Material | Best for | Protection | Printability | Relative cost |
|---|---|---|---|---|
| Single-wall corrugated | Standard courier parcels | Good | Moderate | Low |
| Double-wall corrugated | Heavy or fragile items | Excellent | Low | Medium |
| Rigid board | Luxury/gift presentation | Moderate | Excellent | High |
| Kraft paper/wrap | Void fill, eco branding | Low (fill only) | Good | Low |
| Paperboard (300–600 gsm) | Lightweight retail cartons | Low | Excellent | Low–medium |
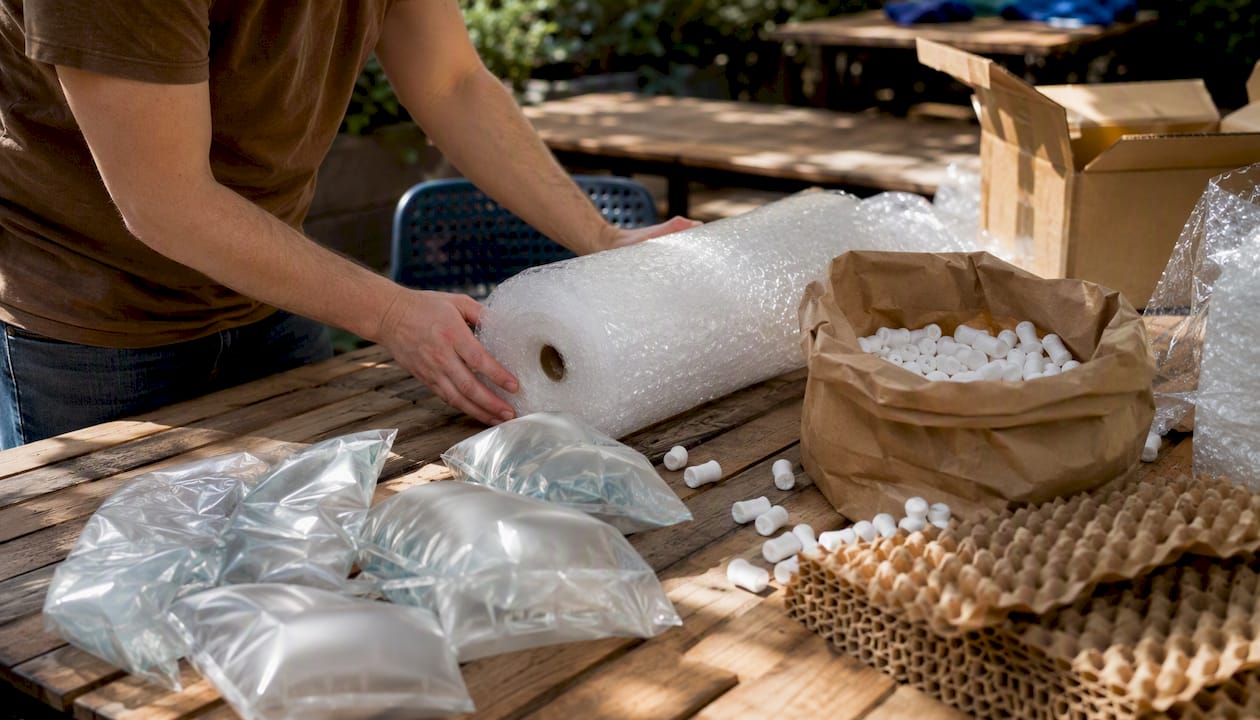
Cushioning options: bubble wrap for general protection, EPS (polystyrene peanuts) for irregular shapes, air bags for lightweight items with large voids, crumpled kraft for eco-conscious packing, and corrugated liners for internal dividers.
Pro Tip: Order sample boards in two or three flute profiles before committing to a pallet. A small up-front cost testing GSM and flute on a real product prevents a costly reprint or repack run later.
Packing fragile, liquid, and electronic items
Standard packing rules get you most of the way there. These three categories need a little more.
Liquids and bottles:
- Seal the bottle cap with a spill-proof bag or heat-sealed polythene liner.
- Wrap the bottle in at least two layers of bubble wrap, securing with tape.
- Place in an inner box with 5 cm of cushioning on all sides. Seal the inner box.
- Place the sealed inner box inside a larger outer box with a further 5 cm cushioning layer.
- Seal the outer box and label it “This Way Up” if the carrier accepts orientation labels.
Electronics:
Static is the hidden risk. EPS foam can generate static charge and damage sensitive components. Use anti-static foam or anti-static bubble wrap instead. Ground the item in its anti-static bag before placing it in the inner box, then cushion with anti-static foam on all sides. The two-box method applies here too for anything above a basic USB accessory.
The two-box method in brief:
- Pack and seal the item in a correctly sized inner box.
- Place the sealed inner box centrally in a larger outer box.
- Fill all voids in the outer box with at least 5 cm of cushioning.
- Seal the outer box with the H-tape pattern.
- Label the outer box only.
Pro Tip: Write “Fragile” or “Liquid” on the outer box and include a handling note inside the parcel. Carriers are not obliged to act on it, but it creates a paper trail if a claim is needed and signals care to the recipient.
Sealing, labelling, and carrier compliance in the UK
Tape choice is not a minor detail. Masking tape, duct tape, and parcel string are not accepted by Royal Mail or major couriers as primary seals, and a parcel that opens in transit is an automatic claim denial. Use polypropylene or PVC shipping tape, at least 48 mm wide, applied with firm pressure along every seam.
Sealing pattern for a corrugated box:
- Centre seam: one strip the full length of the box
- Both end seams: one strip across each end, overlapping onto the sides by at least 5 cm
- Repeat on the base
Label attachment rules:
- Apply to the largest flat face of the parcel
- Keep the label away from all seams, folds, and tape edges
- The barcode must lie flat with no bubbles or creases
- If you protect the label with clear tape, check your carrier’s policy first — some carriers require unobstructed barcodes
Royal Mail’s size thresholds are a common source of unexpected charges. The Large Letter and Small Parcel dimensions and weight bands are important to check carefully. Measure every box size you stock against these bands and mark them clearly at the packing station.
Pre-handover checklist: shipping tape on all seams; label flat and scannable; weight and dimensions recorded; address confirmed; carrier service selected and manifest updated.
Pro Tip: Print a laminated Royal Mail size-band card and fix it to the packing bench. Your team will check dimensions instinctively rather than guessing.
What tools and equipment does a trade print shop need?
A well-equipped packing station does not need to be expensive. It needs to be consistent.
Durable equipment:
- Bench scale (capacity to 30 kg, 1 g resolution) for accurate parcel weights
- Postal scale for letters and large-letter items
- Thermal label printer for carrier labels (faster and more reliable than inkjet)
- Tape dispenser with a brake for clean, one-handed sealing
- Box cutter or safety knife for resizing boxes
- Packing bench at a comfortable standing height
Consumables to stock:
- A core range of three to five corrugated box sizes covering your most common order types
- 48 mm polypropylene shipping tape
- Bubble wrap rolls and pre-cut sheets
- Anti-static bubble wrap or foam for electronics
- Crumpled kraft paper or air bags for void fill
- Polythene bags and spill-proof liners for liquids
- Corrugated inserts and dividers for multi-item orders
Subliblanks supplies all of these consumables as a trade wholesaler with no minimum order quantities, which means you can test a new box size or cushioning type without committing to a full pallet. That flexibility is genuinely useful when you are trialling a new product line or carrier.
Pro Tip: Stock your three most-used box sizes in a clearly labelled rack beside the packing bench. Reaching for the right box without hunting saves two to three minutes per order across a busy day.
Two copyable workflow templates for common order types
Template A: single fragile retail item
Total: approx. 10 minutes per order.
Template B: batch of personalised garments (20 units)
- Sort garments by size and design before packing begins; batching reduces picking errors.
- Fold each garment to a consistent size and place in a polythene bag to protect against moisture.
- Pack two to four garments per box depending on weight, using kraft paper between layers.
- Seal, weigh, and label each box before moving to the next; do not leave unsealed boxes on the bench.
- Group completed parcels by carrier service and record each on the dispatch manifest.
- Target time: 5–7 minutes per parcel once the team has a consistent fold-and-pack rhythm.
Record for claims: note the box size used, cushioning type, weight, and the name of the person who completed the QA check on the picking list. If a damage claim arrives, this record is your evidence.
Common packing mistakes and how to fix them
These are the errors that generate damage claims, courier surcharges, and customer complaints. Most are simple to fix once you know what to look for.
- Wrong box size: a box too large lets the item move; too small compresses it. Fix: stock a defined set of three to five sizes and match box to product plus 5 cm padding on all sides.
- Insufficient padding: under-filling voids is the single most common cause of transit damage. Fix: shake the sealed box before labelling. If the item moves, add more fill.
- Wrong tape: masking tape or duct tape fails under courier handling. Fix: use only 48 mm polypropylene or PVC shipping tape on all seams.
- Label on a seam or fold: the barcode distorts and fails to scan, causing delivery delays. Fix: always apply labels to the largest flat face, clear of all edges.
- Under-weighing or oversizing: incorrect weights lead to surcharges or parcel returns. Fix: weigh every parcel on a calibrated scale and measure all three dimensions before printing the label.
Test any new box size or cushioning combination with a small sample shipment before rolling it out across a full order run. Standardising a small set of compliant box sizes and checking them against Royal Mail and courier size bands up front removes the most common source of postage surprises.
A trade perspective on tightening your packing line
The single change that produces the most visible improvement in a small print shop is not buying better boxes. It is adding one fixed QA checkpoint at the end of the line.
Before that checkpoint exists, errors slip through because everyone assumes someone else checked. After it exists, the team knows the parcel does not move until one person has confirmed the seal, the label, and the weight. Damage claims drop. Reshipments drop. The packing line gets faster because people stop second-guessing each other mid-process.
Standardising box sizes produces the second-biggest gain. When your team can reach for a box without measuring, they pack faster and more consistently. Three sizes cover most small-shop order types: a small corrugated for single items, a medium for two to four garments or accessories, and a large for bulk or fragile orders using the two-box method. Subliblanks’ step-by-step packing guide maps this kind of standardisation directly to the practical realities of UK trade shops, which is why it is worth reading alongside this guide rather than instead of it.
The workflow itself is not complicated. The discipline of following it every time is where most shops fall short.
Stock your packing station through Subliblanks
Subliblanks gives trade print shops direct access to packaging supplies, printers, and consumables with no minimum order quantities, so you can test a new box size or cushioning type on a single order before committing to volume.

The product range covers corrugated boxes, bubble wrap, void fill, anti-static materials, thermal label printers, tape dispensers, and the full range of sublimation and DTF supplies your shop already uses. Ordering everything from one trade source keeps your supply chain simple and your packing station stocked without the overhead of managing multiple accounts.
Browse the full trade range at Subliblanks, or go directly to sublimation printers and equipment if you are upgrading your production line at the same time as your packing station.
Sources
- Packaging tips | UPS
- Packaging Materials UK | Types, Uses & Custom Packaging option
- Packaging Materials Guide | Custom Pack Studio’s Trusted Packaging Supplies in The UK
- How to Ship Smarter in 2026: 7 Packaging Mistakes to Avoid | Parcelsend UK


