


Workflow for DTF transfers: a complete 2026 guide
TL;DR:
- Consistent DTF transfer results require a clear, documented workflow controlling variables like curing, file preparation, and pressing parameters. Proper equipment, materials, and software integration help reduce errors, improve reproducibility, and enhance scalability. Visual cues, such as the glossy orange-peel texture during curing, are essential for achieving quality and durability in transfers.
Getting consistent results from DTF transfers is harder than it looks. Colour shifts, adhesion failures, and premature cracking are not signs of bad luck. They are signs of an undefined process. A clear workflow for DTF transfers takes these variables off the table by giving every step a fixed set of parameters to follow. This guide covers the entire dtf transfer process from file preparation and printing through to heat press application and quality control, so you can build a production system that delivers reliable results every single time.
Table of Contents
- Key takeaways
- What you need before you start
- Steps for DTF transfers: from artwork to cured film
- Applying transfers to garments
- Optimising your DTF workflow for scale
- My perspective: why the process beats the shortcut every time
- Get your DTF supplies from Subliblanks
- FAQ
Key takeaways
| Point | Details |
|---|---|
| File format matters | Export artwork as PNG, PSD, or AI at 300 DPI minimum to avoid white backgrounds and quality loss. |
| Curing is visual, not just timed | Look for a glossy orange-peel texture on the adhesive powder as a reliable cue for correct curing. |
| Pre-press your garments | A 5 to 10 second pre-press removes moisture and flattens fibres, improving final adhesion. |
| Document every parameter | Recording ink density, heat press settings, and peel type turns a one-off into a repeatable process. |
| Software reduces costly errors | Integrated workflow tools automate nesting and white ink choking, improving consistency at scale. |
What you need before you start
Before you produce a single transfer, the right combination of equipment, materials, and software needs to be in place. Missing any one element creates bottlenecks that no amount of technique will fix.
Printer and consumables
A dedicated DTF printer is the foundation. Look for a model that supports active white ink circulation, since white ink settles quickly and clogs print heads without it. You will also need PET transfer film, hot-melt adhesive powder, and a curing oven or heat gun rated for consistent temperature output. DTF printing eliminates the per-setup costs of screen printing, which means there is no financial barrier to running single-piece custom jobs, making equipment investment genuinely worthwhile even for smaller operations.
One underappreciated advantage: DTF works on cotton, polyester, blends, and treated leather without any pretreatment. That versatility simplifies your materials inventory considerably compared to DTG printing.
Software and file requirements
Your RIP (Raster Image Processor) software controls ink density, colour profiles, and the all-important white ink layer. Integrated workflow platforms go further by handling nesting (fitting multiple designs onto one film sheet), automated white ink choking, and production previews in a single environment. Replacing fragmented manual tools with an all-in-one platform improves profit margins and reduces consistency errors across runs.
For design files, the format you supply to the RIP directly affects print quality:
- PNG with a transparent background is the most common and practical choice
- PSD files preserve layers and allow last-minute adjustments without re-exporting
- AI vector files scale without quality loss, ideal for logos and text-heavy designs
- JPEG files lack transparency, causing unwanted white backgrounds that print onto the garment
Resolution must be a minimum of 300 DPI at print size. Scaling up a low-resolution file inside the RIP will not recover lost detail.
Pro Tip: Set up a dedicated incoming file checklist for your team or clients: format, resolution, colour mode (sRGB or CMYK depending on your RIP), and whether a bleed or safe zone is needed. Catching problems here saves time at every later stage.
Workspace and safety
Keep your workspace dust-free near the printer and film, since particles embed in wet ink and ruin transfers. Store adhesive powder in sealed containers away from humidity. Curing ovens and heat presses produce fumes, so adequate ventilation is non-negotiable, not optional.
| Equipment | Specification to check |
|---|---|
| DTF printer | White ink circulation system, minimum A3 print width |
| Transfer film | PET-based, compatible with your ink set |
| Adhesive powder | Hot-melt, fine grain for detailed designs |
| Curing oven | Consistent temperature control, 120°C to 170°C range |
| Heat press | Digital temperature display, even platen pressure |
Steps for DTF transfers: from artwork to cured film
This is where the dtf transfer process becomes physical. Each stage builds directly on the one before it, and cutting corners at any point compounds into a worse outcome downstream.
-
Prepare your artwork. Open your file in the RIP software. Confirm the canvas has a transparent background, not white. Set the colour profile your RIP requires. Check that the design dimensions match the intended print size, since resizing inside the RIP at this stage is acceptable but should be confirmed before sending to the queue.
-
Configure the print sequence. DTF printers lay down CMYK colour layers first, then a white ink layer on top. The white layer acts as a base coat that gives colours vibrancy when transferred onto dark or coloured fabrics. Without a well-configured white layer, dark garments will show muted, washed-out results.
-
Apply white ink choking. Choking the white ink layer by 1 to 2 pixels inside the colour edges prevents the white base from peeking out around the design perimeter. This step is often skipped by beginners, and the result is a visible white halo that makes even technically good prints look amateurish.
-
Print to PET film. Send the job to your DTF printer. Once printed, handle the film carefully as the ink is wet and smears easily. Do not stack wet prints.
-
Apply adhesive powder. Sprinkle hot-melt powder generously over the wet ink, covering the entire printed area. Gently tilt and tap the film to coat evenly, then pour excess powder back into its container. Uneven powder application creates patchy adhesion after pressing.
-
Cure the transfer. Place the powdered film in your curing oven. Temperature and timing vary by equipment, but the most reliable indicator is visual: correct curing produces a glossy orange-peel texture on the powder surface. Under-curing causes adhesion failure in the wash. Over-curing makes the adhesive brittle and prone to cracking after a few laundry cycles.
Pro Tip: If you do not have a curing oven, a heat gun set to around 160°C held 10 to 15 cm above the film works for low-volume runs. Move it slowly and evenly in circular motions to avoid hot spots that over-cure edges while the centre remains tacky.
Applying transfers to garments
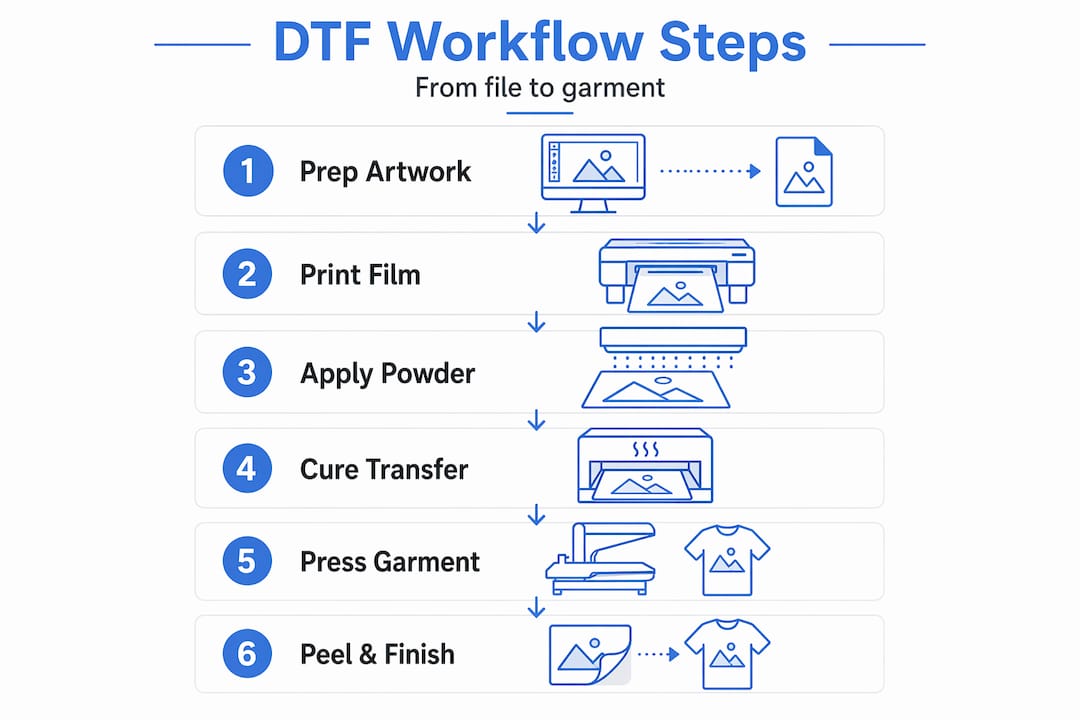
With cured transfers ready, the pressing stage determines final vibrancy and durability. This is where even experienced operators make process errors that could be eliminated with a documented routine.
Preparing the garment
Start by laying the garment flat on the heat press platen. Remove any lint or debris from the print area. Then pre-press the garment for 5 to 10 seconds. Pre-pressing removes moisture and realigns fibres, creating a flatter, drier surface that bonds more evenly with the adhesive. Skipping this step is one of the most common causes of incomplete adhesion, particularly on heavier cotton garments that retain more moisture.
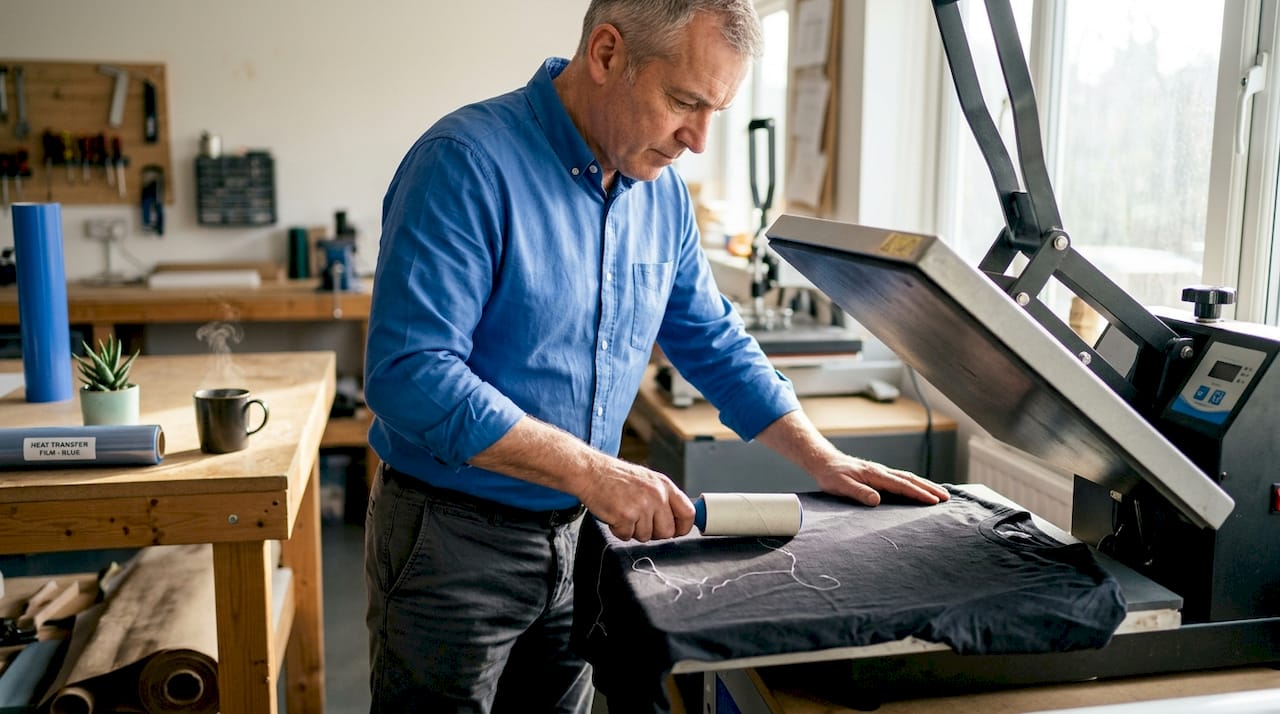
Positioning and pressing
Place the cured transfer onto the garment with the ink side facing down. Use a heat-resistant tape to hold the film in place if you are concerned about shifting during pressing. Lay a Teflon sheet or parchment paper over the transfer before closing the press. This protects both the film and the platen from adhesive residue.
Key pressing parameters to follow:
- Temperature: 160°C to 175°C is the recommended range, with the precise setting depending on fabric type
- Pressure: Medium to firm. Too little pressure leaves adhesion gaps; too much can flatten the texture of performance fabrics
- Time: 10 to 20 seconds. Thicker fabric and higher-stretch blends tend to need the upper end of this range
Peeling and finishing
The peel method affects how the final print looks and feels.
- Hot peel (peeling the film immediately after pressing) produces a slightly softer finish and is faster for production runs
- Cold peel (waiting until the transfer cools completely) typically produces sharper detail and is recommended for complex, fine-line designs
Testing your specific film and ink combination with both methods is the only reliable way to determine which gives better results for your particular setup. Film manufacturers often specify a preference, but substrate type and ink density both influence the outcome.
Pro Tip: For stretchy fabrics like athleisure blends, always do a test press on a swatch before committing to the full run. Stretch the pressed swatch after cooling to check for cracking. If it cracks, reduce temperature slightly and extend time.
For a detailed walkthrough of each pressing stage, the DTF transfer application guide at Subliblanks covers garment-specific considerations in depth.
Optimising your DTF workflow for scale
Producing one excellent transfer is a skill. Producing a hundred consistently is a system. This is where how to manage dtf workflow becomes the central question for any print shop looking to grow.
Document everything first
Recording parameters such as ink density, heat press temperature, and peel type is the single most effective thing you can do to improve reproducibility. Create a job card template that captures these values for every run. When something goes wrong, and it will, you will have a baseline to diagnose against rather than guessing.
Build in routine quality checks
Build these checkpoints into every production day:
- Nozzle check prints at the start of each session to confirm all ink channels are firing correctly
- Wash tests on new film or ink batches before a full run
- Colour calibration checks when switching between substrate types or after extended machine downtime
- Visual inspection of cured transfers under good lighting before pressing, looking for powder gaps or under-cured patches
Use software to handle the repetitive decisions
Optimising dtf workflow at scale means letting software manage what it does better than humans. Batch nesting (arranging multiple designs on one film sheet to minimise waste) is tedious and error-prone manually. Integrated RIP software does it automatically. The same applies to white ink choking, colour profile management, and print queue sequencing. Integrated workflow software reduces the mental load on your operators and makes it easier to onboard new staff.
| Workflow approach | Outcome |
|---|---|
| Manual nesting per job | High film waste, slower throughput |
| Software-automated nesting | Lower film waste, faster turnaround |
| Ad hoc press settings | Inconsistent adhesion, more reprints |
| Documented press parameters | Reproducible results, fewer errors |
Pro Tip: Standardise your template library. Create a set of pre-approved file templates for common garment types (T-shirt front, left chest, sleeve) with correct dimensions and safe zones already set. Designers drop artwork into the template rather than setting up from scratch each time, cutting prep time significantly.
My perspective: why the process beats the shortcut every time
I have seen print shops produce stunning sample prints and then struggle to replicate them a week later. The prints have not changed. The process has. When curing is done by feel rather than observation, when press temperatures are estimated rather than calibrated, quality becomes random. That is not a business.
What I have found, working with print operations at various scales, is that the operators who invest time in documenting their workflow at the start spend far less time troubleshooting later. The upfront cost of creating a proper SOP, including wash tests, nozzle checks, and documented press settings, pays back within the first month of consistent production.
The most common shortcut I see is rushing the curing stage. People check the clock rather than the glossy orange-peel finish that signals the powder has fully melted. The consequence shows up in the wash, not on the press, so it is easy to miss the connection. Trusting visual cues over fixed timing is one of those small process details that separates reliable output from inconsistent work.
Technology is making it easier to close this gap. DTF workflow software now handles a large part of the calibration and nesting work that used to require an experienced eye. That is genuinely good news for smaller shops building capacity. But it still requires a person who understands the fundamentals to set up the software correctly in the first place.
— chris
Get your DTF supplies from Subliblanks

If you are ready to put a proper workflow for dtf transfers into practice, you need supplies you can rely on. Subliblanks is a UK trade wholesaler stocking a full range of DTF printing supplies, including transfer films, hot-melt adhesive powders, and inks, with no minimum order quantities. That means you can source what you need for a single trial run or a full production batch without committing to excess stock. Subliblanks also carries heat presses and accessories suited to DTF application, so you can build or upgrade your setup from one supplier. Browse the full range to find the right products for your current setup and the next stage of your print operation.
FAQ
What file format should I use for DTF transfers?
Use PNG, PSD, or AI files at a minimum of 300 DPI. JPEG files lack transparency and produce unwanted white backgrounds on the printed transfer.
What temperature should I use for a heat press with DTF transfers?
The recommended range is 160°C to 175°C for 10 to 20 seconds at medium to firm pressure. Always test on the specific fabric type first, as stretch blends and performance fabrics may need adjusted settings.
How do I know if a DTF transfer has been cured correctly?
Look for a glossy orange-peel texture on the surface of the adhesive powder. Under-cured transfers fail in the wash; over-cured transfers crack after laundering.
What is white ink choking and why does it matter?
White ink choking pulls the white base layer 1 to 2 pixels inside the colour edge of a design. Without it, white ink shows around the perimeter of the print, creating a halo effect that compromises the finished look.
Do I need to pre-press a garment before applying a DTF transfer?
Yes. A 5 to 10 second pre-press removes moisture and flattens fabric fibres, which produces more even and durable adhesion when the transfer is applied.
Recommended
- Understanding DTF technology: Key benefits for UK printers – SubliBlanks Ltd
- What does DTF mean? A complete guide to direct-to-film printing – SubliBlanks Ltd
- Why choose DTF supplies: maximise print versatility and ROI – SubliBlanks Ltd
- DTF Printing: Transforming Garment Businesses Today – SubliBlanks Ltd


