



How to use an xTool laser: beginner's guide 2026
TL;DR:
- Setting up an xTool laser involves connecting it to software, focusing accurately, and testing with prescribed settings. Proper ventilation and routine maintenance are essential for safety, performance, and consistent results. Following a systematic sequence and documenting profiles help beginners achieve reliable, high-quality engravings efficiently.
To use an xTool laser, connect it to xTool Studio (XCS), place and focus your material, load or test a material profile, preview the job, then start while staying in the room. That is the whole loop. Most beginners can complete a first engraving in under an hour once the machine is assembled.
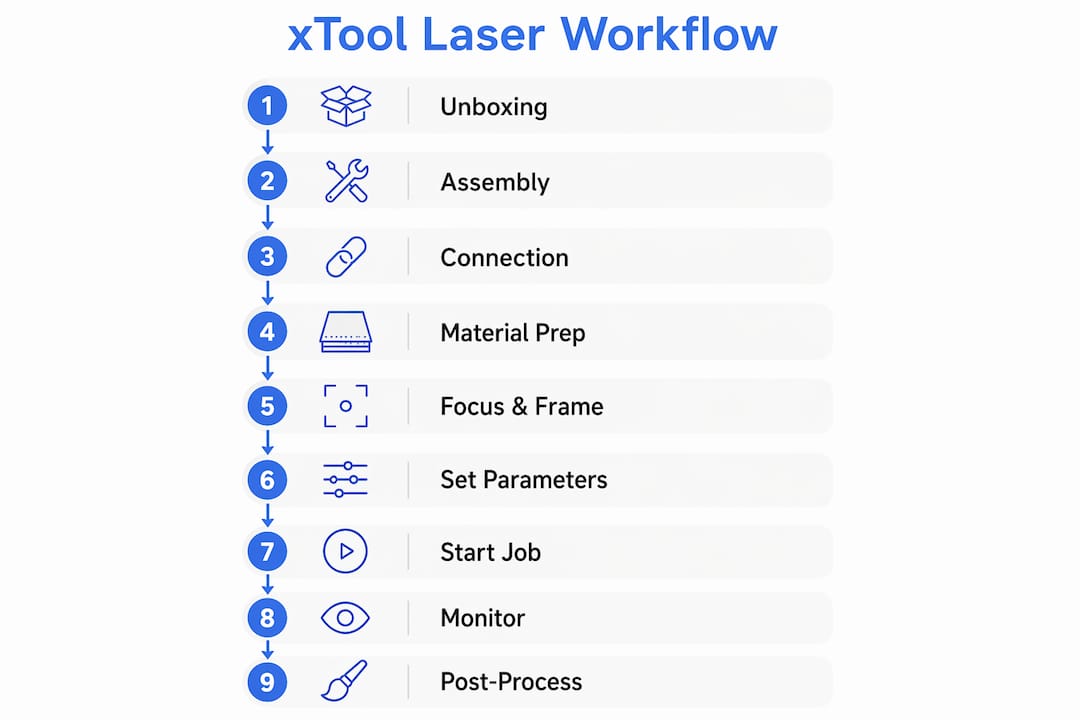
Here is the minimal sequence at a glance:
- Connect the machine to your computer via USB or Wi-Fi and open XCS
- Import or create your design in XCS and assign an operation (engrave, cut, or score)
- Place your material flat on the bed and secure it so it cannot shift
- Set focus using the auto-measure probe or the manual focus knob
- Frame the job so you can see exactly where the laser will travel
- Set power, speed and passes using the EasySet library or a tested profile
- Start the job with ventilation running and stay present throughout
A typical first session, including unboxing, assembly and a short test engrave, takes roughly under two hours. Once you know the machine, a simple coaster job runs in a relatively short time from design to finished piece.
Table of Contents
- How do you set up and connect an xTool laser for the first time?
- How to install xTool Studio and get your first design ready
- How to prepare your material and secure it on the laser bed
- How do you set laser focus and position the work area accurately?
- How to frame a job and preview the processing path before you start
- Choosing the right power, speed and passes for your material
- How to run a material test array to find the right settings
- What to do when you start a job and how to finish it safely
- What are the most common beginner mistakes and how do you fix them?
- Laser safety and routine maintenance for UK users
- Step-by-step first project: engraved plywood coaster
- Sourcing materials and scaling a small laser business in the UK
- Key takeaways
- What beginners actually find hard (and what actually helps)
- Stock your xTool workflow with the right blanks from Subliblanks
- Useful sources and official xTool resources
How do you set up and connect an xTool laser for the first time?
Unboxing and assembly
Every xTool machine ships with the laser module, air assist tube, exhaust hose, power cable, focus tool or probe, and a small accessory kit. Lay everything out before you start. The laser module clips or slides onto the gantry depending on the model; the manual shows the exact attachment points, and it is worth following those steps carefully because a loose module causes misalignment later.
Once the module is fitted, connect the air assist tube to the module’s inlet and run the exhaust hose to a window or an inline extraction fan. Position the machine on a stable, non-flammable bench with sufficient clearance on all sides. Avoid placing it directly on carpet or near curtains.
Ventilation: the step most beginners skip
Air assist and exhaust setup genuinely affects cut quality as well as safety. A short hose run to an open window works for occasional use, but for longer sessions an inline fan with adequate airflow rating keeps fumes moving reliably. Filtered recirculation units are available if you cannot vent to the outside, though they need their carbon filters replaced regularly. For a UK workshop or spare room, a basic inline duct fan from any electrical supplier does the job without specialist equipment.
UK electrical note: xTool machines ship with a standard IEC power cable. UK users need a standard 3-pin plug adaptor or a replacement UK-spec cable; the machines run on 100–240 V so no voltage converter is required.
Connecting to your computer
Two options: USB or Wi-Fi. USB is simpler for a first session. Plug in, open XCS, and the software detects the machine automatically. Wi-Fi requires you to enter your network credentials on the machine’s touchscreen (where fitted) or via the XCS device setup wizard. Wi-Fi is more convenient for a permanent workshop setup because you can send jobs from anywhere on the network without a cable run.

Pro Tip: If XCS does not detect the machine over USB, check that the driver installed correctly during XCS setup. On Windows, open Device Manager and look for an unknown device; reinstalling the XCS driver package usually resolves it within two minutes.
How to install xTool Studio and get your first design ready
xTool Studio (XCS) is the free design and control software for all current xTool machines. Download it from the xTool Software Learning Centre and run the installer; it takes about five minutes on a standard Windows or macOS machine.
- Run the installer and accept the driver installation prompts. XCS installs a USB driver alongside the main application.
- Open XCS and follow the first-run setup wizard. It will ask you to select your machine model; choose the correct one because canvas size and feature availability depend on it.
- Check for firmware updates. XCS prompts you if a firmware update is available for the connected machine. Install it before your first job; skipping updates is a common cause of unexpected behaviour.
- Watch the built-in tutorial. The xTool Studio beginner tutorial series walks through the interface in under 30 minutes. It covers the side menus, font tools, vector editing and basic image processing. Worth doing once before you start a real job.
- Connect your device in XCS. Click the device icon in the top bar, select USB or Wi-Fi, and wait for the status indicator to turn green. A green indicator means XCS can communicate with the machine.
- Import your design. Go to File → Import or drag the file directly onto the canvas.
Supported file formats and export settings
XCS accepts SVG, DXF, PNG, JPG, BMP, and PDF. For cutting and scoring, SVG or DXF gives the cleanest results because they carry vector paths rather than pixel data. When exporting from Inkscape, set units to millimetres and document size to match your material. From Adobe Illustrator, export as SVG with “Use Artboards” ticked. For raster engraving (photographs, textures), PNG at 300–600 DPI works well; higher resolution does not improve output beyond the machine’s optical resolution.
Once imported, assign each layer an operation: Engrave, Cut, or Score. The XCS material library panel sits on the right side of the interface; selecting a material there pre-fills power, speed and passes. That is the EasySet library, and it is the right starting point for any xTool-branded material.
How to prepare your material and secure it on the laser bed
Choosing your material
Common beginner materials include 3 mm plywood, 3 mm MDF, 3 mm acrylic, vegetable-tanned leather, and coated metal blanks. All are widely available from UK craft suppliers and trade wholesalers. Plywood and MDF are forgiving for a first cut; acrylic produces clean edges but needs slightly more attention to focus. Coated blanks, such as anodised aluminium keyrings or powder-coated slates, engrave without cutting and are popular for small-business product lines.
Thickness matters more than most beginners expect. A 1 mm error in thickness shifts the focal point enough to blur fine detail or prevent a clean cut. Measure with digital callipers rather than relying on the nominal size printed on the pack; sheet materials often vary by 0.3–0.5 mm from batch to batch.
Securing the material
A material that moves mid-job ruins the piece. Options:
- Honeycomb clamps (supplied with some models or sold separately) grip the edges without obstructing the work area
- Double-sided tape on the underside works well for thin, flat sheet materials
- Jigs cut from scrap MDF hold irregular or small parts consistently, which is especially useful when batching identical items
- Sacrificial baseboard: a sheet of cheap MDF under the workpiece protects the honeycomb bed from stray laser passes and makes cleanup easier
Pro Tip: Note the X and Y coordinates of your material’s corner in XCS after positioning. If you need to rerun the job or add a second pass, you can return to exactly the same position without re-measuring.
For laser engravable blanks, consistency of thickness across a batch is particularly important. Request a technical data sheet from your supplier and check the tolerance before ordering in volume.
How do you set laser focus and position the work area accurately?
Focus is the single biggest variable in cut and engrave quality. Get it wrong and even perfect settings produce blurry engraving or failed cuts.
Auto-measure vs manual focus
- Auto-measure (where available): Some xTool models include a distance probe that lowers to touch the material surface and sets focus automatically. Place the material, click the auto-measure button in XCS, and the machine does the rest. This is the fastest and most repeatable method.
- Manual focus knob: On models without a probe, use the supplied focus tool (a small acrylic block or ruler) to set the gap between the laser module and the material surface. Loosen the module, lower it until the tool fits snugly underneath, then tighten. The gap distance varies by model; check the quick-start card for the correct value.
- Confirm focus visually: Run a short test engrave on scrap. A correctly focused beam produces a sharp, narrow mark. A defocused beam produces a wide, faint, or fuzzy mark.
Positioning modes and model differences
The xTool D1 series uses a red cross indicator to show the laser position. That red cross has a physical offset from the actual laser output; XCS compensates for this automatically in most cases, but if you are using third-party software or have reset device settings, you may need to re-enter the offset value manually. Ignoring this is one of the most common causes of systematic misalignment on D1 machines.
The xTool S1 uses Pin-point™ positioning, which relies on absolute coordinates rather than camera alignment. You measure two reference points on the material, enter them in XCS, and the software maps the design to those coordinates precisely. This works well for rectangular materials and repeat jobs; for non-rectangular shapes, you need to measure additional reference points. Absolute coordinates also mean that if you document the position of a jig on the bed, you can return to it reliably for batch runs.
Some models support a laser-spot positioning mode, where the actual laser (at very low power) marks the registration point rather than the red cross. Switching between positioning modes changes the effective registration point, so confirm which mode your model supports before relying on it for fine work.
How to frame a job and preview the processing path before you start
Framing is a dry run without the laser firing. In XCS, click the Frame button and the laser head traces the outer boundary of your design at low speed. Watch where it travels: if it goes near the edge of the material or outside it entirely, reposition the material or move the design on the canvas before continuing.
The XCS preview and runtime estimate tools go further. The path preview shows the exact order in which the laser will process each element, which matters for complex designs where processing order affects quality (cuts should generally run after engraving so the material stays flat). The runtime estimate helps you plan batch jobs; a job that takes 45 minutes per piece changes your production economics significantly compared to one that takes 8 minutes.
Two practical rules: always frame before a first run on a new material or design, and always check for obstructions (clamps, cables, the exhaust hose) that the laser head might hit during travel. On enclosed models such as the S1, confirm the lid is properly closed before starting.
Choosing the right power, speed and passes for your material
Start with EasySet
The EasySet material library in XCS contains manufacturer-tested parameters for xTool-branded materials. Select your material from the library and the correct power, speed and pass count populate automatically. For a first job on an xTool-supplied blank, this is the right starting point; the settings are conservative enough to avoid burning while still producing clean results.
For non-xTool materials, EasySet gives a useful ballpark but material test arrays are the reliable method. Never guess settings for an unfamiliar material; a wrong combination wastes the piece and can cause charring or fire.
How power, speed and passes interact
- Higher power removes more material per pass; too high causes burning and charring
- Higher speed reduces the energy delivered per millimetre; too fast produces incomplete cuts or faint engraving
- More passes compensate for insufficient single-pass power, but each additional pass adds heat and can widen the kerf
- Focus amplifies or reduces the effect of all three; a defocused beam at high power still underperforms a focused beam at moderate power
Rough starting points for common thin materials (treat these as examples, not guarantees):
- 3 mm plywood, cutting: 100% power, 10–15 mm/s, 2–3 passes depending on machine wattage
- 3 mm acrylic, cutting: 100% power, 8–12 mm/s, 1–2 passes
- Anodised aluminium blank, engraving: 60–80% power, 200–400 mm/s, 1 pass
Pro Tip: Save every successful parameter set as a named profile in XCS. Label it with the material, thickness, supplier and date. A saved profile library is one of the most valuable assets a small laser business can build.
How to run a material test array to find the right settings
A test array is a grid of small engrave or cut samples, each at varying power and speed combinations. It is the fastest way to find working settings for any material you have not used before.
The two-stage testing method
xTool Academy recommends reaching a functional 70% result first, then refining toward a 100% finish. In practice: run a coarse grid to find the zone where the laser is doing useful work, then run a finer grid within that zone to find the optimal settings. This approach uses far less material than testing every possible combination from scratch.
Building a test matrix in XCS
- Open XCS and create a small rectangle or text element (10 × 10 mm works well).
- Use the Material Test function (available in the XCS processing panel) to generate a grid automatically. Set the power range (e.g. 40–100%) across columns and the speed range (e.g. 100–500 mm/s) across rows.
- Place a scrap piece of your target material on the bed, focus, frame, and run the array.
- Examine each cell under good light. Note which combinations produce clean results.
Sample test matrix outcomes
| Power / Speed | 100 mm/s | 200 mm/s | 400 mm/s |
|---|---|---|---|
| 40% | Deep, slight char | Clean engrave | Light engrave |
| 60% | Charred edges | Good depth | Clean, moderate depth |
| 80% | Heavy char | Slight char | Good depth |
| 100% | Burning | Moderate char | Clean, deep |
The “clean, moderate depth” cell at 60% power / 200 mm/s is the 70% result. From there, test 55–65% power at 180–220 mm/s to find the 100% finish.
Evaluation checklist:
- Good cut: clean edge, slight taper, material separates with light pressure
- Good engrave: consistent depth, no charring, sharp edges on fine detail
- Signs of burning: dark brown or black edges, acrid smell, surface bubbling on acrylic
- When to add passes: material does not separate but edges look clean (increase passes before increasing power)
- When to adjust focus: marks are wide and fuzzy regardless of power (refocus first, then retest)
What to do when you start a job and how to finish it safely
Pre-start checklist
Before pressing start, confirm: exhaust fan running, air assist connected and switched on, fire extinguisher within reach, no flammable materials within 50 cm of the machine, lid closed (enclosed models), and the frame run completed without issues.
Monitoring during the run
Stay in the room. Watch for unusual smoke volume, a sharp burning smell that differs from normal wood or acrylic processing, any visible flame, or the laser head catching on a clamp or warped material. XCS displays a progress bar and remaining time; use that to plan when to check in rather than walking away entirely.
If something looks wrong, press the pause button in XCS or the physical stop button on the machine. Do not open the lid immediately on an enclosed model; wait a few seconds for the fan to clear residual fumes.
Post-job steps
Let the piece cool for 30 seconds before handling. Remove masking tape (if used) while the material is still slightly warm; it peels more cleanly. Wipe the lens with a lint-free optical cloth and isopropyl alcohol if you notice any residue; a dirty lens reduces power and causes inconsistent results over time. Clear debris from the bed and honeycomb. Record the settings that worked in your XCS profile library.
The XCS preview and runtime estimate feature is useful for batching: if a single coaster takes 8 minutes, you can plan a batch of six and run them sequentially with minimal repositioning. Group identical jobs by material and settings to avoid reconfiguring between runs.
What are the most common beginner mistakes and how do you fix them?
Most first-session failures trace back to four causes: wrong focus, untested settings, material movement, or a connectivity problem. Work through them in that order before changing anything else.
Diagnostic flow: check focus → check material thickness and flatness → check power/speed settings → check clamping → check connectivity.
Burning and charring
- Reduce power by 10–15% and retest
- Increase speed by 20–30% and retest
- Check focus; a defocused beam delivers energy over a wider area and burns more
- For wood, masking tape on the surface reduces surface charring without affecting cut depth
Incomplete cuts
- Add one pass before increasing power
- Verify material thickness with callipers; nominal 3 mm sheet is often 2.7–3.2 mm
- Check that the material is flat; a bowed sheet changes the focal distance across the cut
Misalignment
- On D1 models, confirm the red cross offset is correctly entered in XCS device settings
- On S1 models, re-measure your reference points if the job has shifted
- Check that the material did not move between framing and starting; re-clamp if needed
Connectivity issues
- USB: try a different cable and a different USB port; avoid USB hubs
- Wi-Fi: move the machine closer to the router for initial setup; check that the machine and computer are on the same network band (2.4 GHz vs 5 GHz)
- Restart XCS and the machine if the status indicator stays red after connection attempts
- Reinstall the XCS driver package if USB detection fails repeatedly
Common beginner mistakes such as relying on generic settings and skipping material testing account for the majority of first-session failures on D1 machines. Running a test array before committing to a full job eliminates most of these.
Laser safety and routine maintenance for UK users
Core safety rules
Never run the machine unattended. Laser engravers can ignite materials, particularly thin wood and paper, and a fire can develop quickly if no one is present. Keep a CO₂ fire extinguisher within arm’s reach, not across the room.
Ventilation is not optional. Even low-wattage diode lasers produce fumes that are harmful with repeated exposure. Air assist and a working exhaust are the minimum; an inline fan rated for your hose length improves extraction significantly. For a long hose run (over 2 metres), a booster fan prevents back-pressure that reduces extraction efficiency.
Wear appropriate eye protection when the lid is open and the machine is powered. Diode lasers operate in the visible blue spectrum; standard safety glasses are not sufficient. Use glasses rated for the specific wavelength of your machine (typically 445–450 nm for blue diode lasers).
UK users should follow Health and Safety Executive (HSE) guidance on laser safety in the workplace. For home hobbyists, the practical requirements are the same: ventilation, eye protection, fire safety, and never leaving the machine running unsupervised.
Maintenance schedule
After every session:
- Wipe the laser lens with an optical cloth and isopropyl alcohol
- Clear debris from the bed and honeycomb
Weekly (or every 10 hours of use):
- Check belt tension on both axes; a loose belt causes wavy lines in engraving
- Inspect the air assist nozzle for blockages
- Check the exhaust hose for kinks or debris
Monthly:
- Check and clean the guide rails with a dry cloth; apply a small amount of machine oil if the carriage feels stiff
- Check firmware version in XCS and update if available
- Inspect the laser module connector for any signs of heat damage
Step-by-step first project: engraved plywood coaster
This project produces a clean engraved coaster in a single session and applies every step covered above.
Materials and tools:
- One 90 mm × 90 mm × 3 mm birch plywood blank (available from UK craft suppliers or Subliblanks)
- Masking tape
- Digital callipers
- A simple circular design in SVG format (free templates available from xTool Academy)
- Estimated cost: under £1 per coaster; estimated total time: 25–35 minutes for a first attempt
Steps:
- Measure the blank. Use callipers to confirm thickness. Note the exact value.
- Import the design. Open XCS, import your SVG, and resize it to 80 mm diameter to leave a 5 mm border.
- Assign the operation. Set the inner design to Engrave and the outer circle to Score or Cut depending on whether you want a shaped edge.
- Apply masking tape to the top surface of the blank to reduce surface charring.
- Place and secure the blank on the bed with honeycomb clamps or double-sided tape. Note the corner coordinates in XCS.
- Set focus. Use auto-measure or the manual focus tool for your model.
- Select material settings. Choose birch plywood from the EasySet library, or use a tested profile if you have one.
- Frame the job. Confirm the laser head traces within the blank boundary.
- Start the job with ventilation running. A single coaster at moderate settings takes roughly 6–12 minutes.
- Remove masking tape while the piece is warm. Sand lightly if needed and apply a food-safe finish for a professional result.
Troubleshooting this project: if the engraving looks faint, increase power by 10% and retest on scrap. If the masking tape leaves adhesive residue, remove it sooner after the job ends. For batching, cut a simple MDF jig with a 90 mm square pocket; drop each blank in, run the job, swap the blank, repeat.
Sourcing materials and scaling a small laser business in the UK
What to look for when buying blanks and consumables
Consistency is the variable that separates a smooth production run from a frustrating one. When evaluating a blank supplier, check:
- Thickness tolerance (ideally ±0.1 mm across a batch)
- Surface finish consistency (coated blanks should have uniform coating weight)
- Whether the supplier can confirm the material is laser-engrave suitable (not all coatings respond the same way)
- Availability of technical data sheets or recommended settings
Request a sample pack before ordering in volume. A small test order across two or three material types tells you more than any product description. Subliblanks supplies laser engravable blanks with no minimum order quantity, which makes sample testing practical without committing to a large stock purchase.
Scaling workflow without sacrificing quality
The fastest route to higher throughput is standardisation, not speed. Build a library of tested material profiles in XCS, create reusable design templates for your most popular products, and cut dedicated jigs for each blank size you use regularly. A jig that positions ten keyrings at once turns a ten-step process into a one-step load.
Laser engraving in a business context rewards operators who document everything. Keep a simple spreadsheet: material, supplier batch number, thickness, XCS profile name, and output quality rating. When a batch produces inconsistent results, that record tells you whether the variable is the material or the settings.
Pro Tip: Run a test array at the start of every new material batch, even if you have used the same product before. Coating batches and sheet batches vary; a five-minute test saves a run of ruined blanks.
Key takeaways
Setting up and operating an xTool laser reliably comes down to three things: correct focus, tested material settings, and consistent ventilation from the first job to the last.
| Point | Details |
|---|---|
| Follow the standard sequence | Connect, design, place, focus, frame, set parameters, then start — skipping any step causes avoidable failures. |
| Use EasySet as your baseline | The EasySet library gives manufacturer-tested starting points; always test non-library materials with a power/speed array before committing to a full job. |
| Focus before every job | A 1 mm focus error degrades cut and engrave quality significantly; use auto-measure where available and verify with a scrap test. |
| Ventilation is non-negotiable | Run the exhaust fan and air assist for every session; an inline fan rated at 200 m³/h or above handles most hobby and small-business workloads. |
| Subliblanks for blanks and consumables | Subliblanks supplies laser engravable blanks and consumables with no minimum order, making sample testing and scaling practical for UK makers. |
What beginners actually find hard (and what actually helps)
The honest picture of a first week with an xTool laser is this: the machine itself is not the hard part. XCS is well-designed, the EasySet library removes most of the guesswork for xTool materials, and the xTool Academy tutorials are genuinely useful rather than filler. What trips people up is the gap between “I followed the instructions” and “I understand why it works.”
Focus is the clearest example. Most beginners set it once and assume it stays correct. It does not. A slightly warped sheet, a different material thickness, or a jig that sits 0.5 mm higher than expected shifts the focal point enough to matter. The habit of checking focus at the start of every session, not just the first, is what separates consistent output from inconsistent output.
Test arrays feel like extra work until the first time they save a batch of expensive blanks. The two-stage testing method from xTool Academy, reach 70% first then refine, is a genuinely useful mental model. It stops the instinct to push settings to maximum and then wonder why everything is charred. Treat settings like a recipe you are developing, not a code you are cracking.
For small businesses, the other underestimated factor is documentation. A saved XCS profile is useful; a profile with a note about which supplier batch it was tested on is far more useful six months later when results start drifting and you cannot remember what changed.
Stock your xTool workflow with the right blanks from Subliblanks
Getting the machine dialled in is only half the equation. The other half is having materials you can trust to behave consistently from one batch to the next.

Subliblanks is a UK trade wholesaler supplying laser engravable blanks, consumables, and xTool laser machines with no minimum order quantity. That means you can order a sample pack of keyrings, coasters, or coated slates before committing to volume, test them against your saved XCS profiles, and scale up only when the results are right. No bulk commitment, no guesswork about whether the material will perform. Browse the full range at Subliblanks and place your first order today.
Useful sources and official xTool resources
The following official xTool resources are worth bookmarking for model-specific detail and advanced features:
- xTool Academy — structured courses covering software, settings and project tutorials; the best starting point for systematic learning
- xTool Studio Software Learning Centre — XCS installation guides, firmware update instructions, and the full software wiki
- xTool Studio Beginner Tutorial Series — video walkthrough of the XCS interface; covers every core tool in under 30 minutes
- EasySet material library guide — explains how to use and import material presets in XCS
- Master laser settings: universal formula — xTool Academy’s two-stage testing method explained in full
- S1 Pin-point™ positioning guide — detailed walkthrough of absolute coordinate positioning on S1 models
- Positioning offset reference — explains red cross offsets and how to correct them in XCS
For firmware updates and model-specific documentation, always use the xTool Support Centre rather than third-party guides, as firmware versions change frequently and older guides may reference deprecated settings.
Recommended
- Understanding laser engraver machines: a practical guide – SubliBlanks Ltd
- How to engrave laser blanks for professional custom products – SubliBlanks Ltd
- Essential guide to laser engravable blanks for UK makers – SubliBlanks Ltd
- Laser engravable blanks: best materials and tips for 2026 – SubliBlanks Ltd


