


How to engrave laser blanks for professional custom products
TL;DR:
- Material choice significantly impacts laser engraving quality and process settings.
- Proper workspace setup and thorough testing are essential for professional results.
- Operator technique and preparation outweigh equipment cost for consistent, high-quality engraving.
Scorched edges, blurry text, and wasted materials are the fastest way to lose confidence in laser engraving. Whether you are running a small craft business in Cork or a home workshop in Birmingham, inconsistent results on laser blanks can feel demoralising and expensive. This guide walks you through everything you need to produce clean, professional engravings every single time: material selection, workspace setup, precise settings, troubleshooting, and finishing. By the end, you will have the knowledge to turn raw blanks into sellable, gift-worthy custom products with far less trial and error.
Table of Contents
- Understanding laser blanks and material choices
- Essential tools and workspace setup
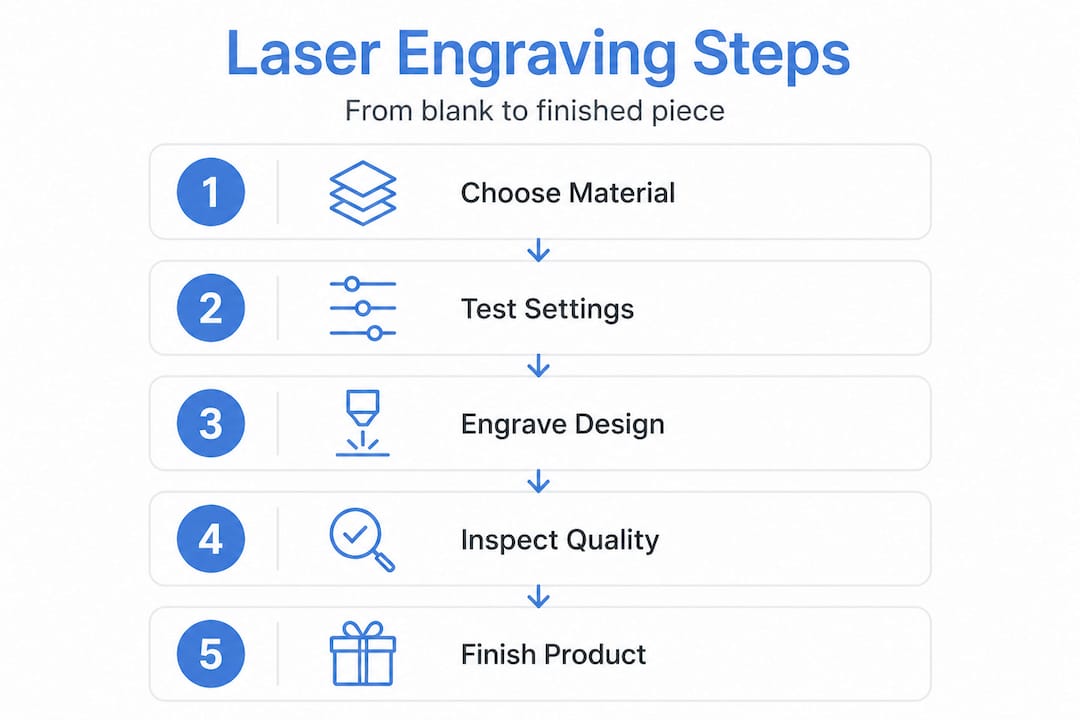
- Step-by-step: How to engrave your laser blanks
- Troubleshooting and best practices
- Finishing and quality control
- Why careful preparation trumps expensive equipment
- Explore high-quality laser blanks and supplies
- Frequently asked questions
Key Takeaways
| Point | Details |
|---|---|
| Know your materials | Choosing the correct blank type is crucial for crisp engravings and maximising your results. |
| Setup impacts quality | Proper equipment, workspace, and settings make more difference than expensive machinery. |
| Perfect your process | Small tweaks like multiple light passes and correct focus dramatically improve consistency. |
| Inspect and finish | Careful cleaning and inspection ensure your custom products look truly professional. |
Understanding laser blanks and material choices
Laser blanks are pre-cut, unfinished items like wood shapes, acrylic sheets, metal tags, and laminates designed for laser engraving to create custom products such as coasters, keychains, and plaques. That definition matters because it immediately tells you what these items are not: they are not finished goods, and they are not interchangeable. The material you choose will determine everything from your laser settings to your finishing method.
For anyone new to this process, understanding custom blanks is the logical starting point before spending money on stock. Here is a breakdown of the most popular materials and their typical applications:
| Material | Best for | Engraving behaviour |
|---|---|---|
| Baltic birch plywood | Keychains, plaques, signs | Consistent grain, minimal charring |
| Basswood | Decorative gifts, ornaments | Very smooth, low resin content |
| Acrylic (opaque/cast) | Tags, awards, signage | Crisp, frosted engraving |
| Stainless steel | Dog tags, bottle openers | Requires marking spray or fibre laser |
| Anodised aluminium | Name badges, industrial tags | Excellent contrast, no spray needed |
| Vegetable-tanned leather | Keyrings, wallets, bookmarks | Rich, dark burn with good detail |
Beyond the material itself, laser blanks come in a wide variety of pre-shaped forms. You will find hearts, stars, rectangles, rounds, and custom silhouettes ready to engrave straight out of the packet. This saves significant cutting time and means you can focus entirely on the engraving quality. Pre-shaped forms are especially popular for keychains, name badges, plaques, and personalised gifts for weddings, birthdays, and corporate events.
Choosing the right material is not just an aesthetic decision. It directly affects your laser settings, the depth of your engraving, and the amount of post-processing required. Getting this right from the start saves time, money, and frustration.
Matching material to application is where many beginners go wrong. Wood is forgiving and widely available, making it ideal for practice and high-volume gift production. Anodised aluminium produces a striking black-on-silver contrast that suits professional name badges and corporate gifts. Acrylic, when cast and opaque, gives a clean frosted finish that looks premium on awards and signage. For those exploring how printing blanks explained differ from laser-specific blanks, it is worth noting that some blanks are designed exclusively for one process, so always confirm compatibility before ordering.
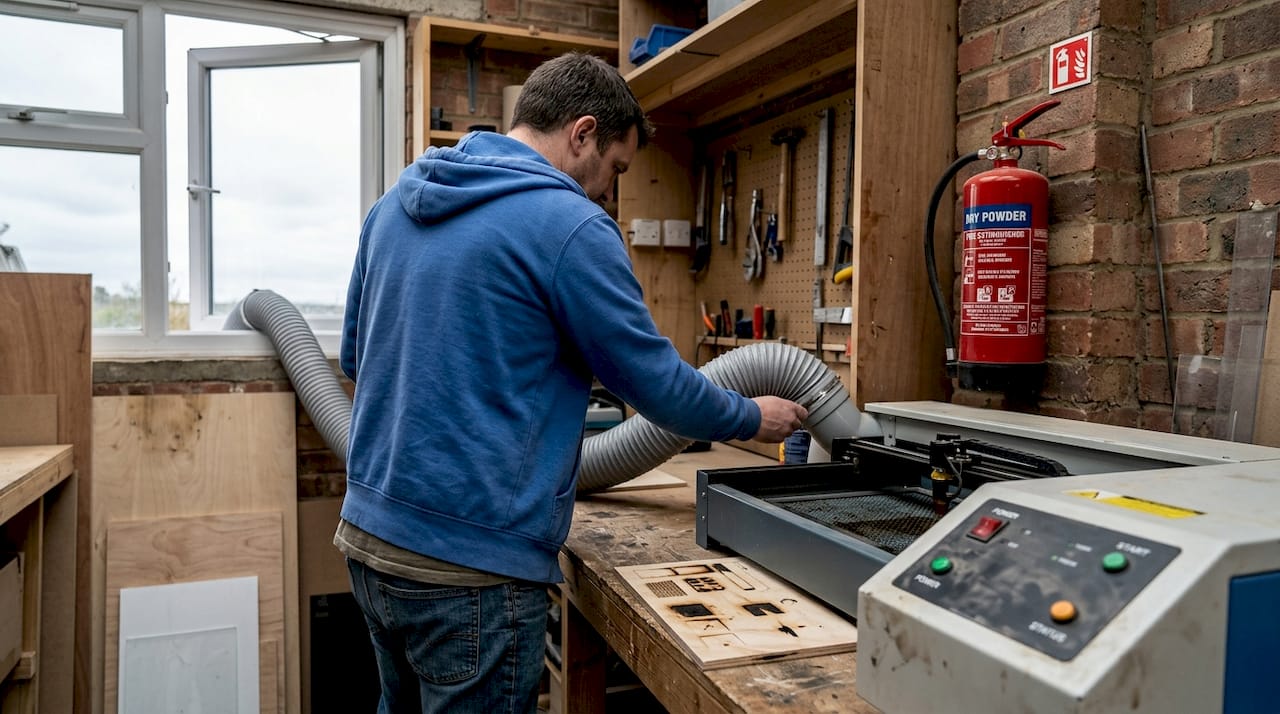
Essential tools and workspace setup
With an understanding of material options, it is time to prepare your tools and workspace for safe and effective engraving. Getting this stage right is not glamorous, but it is where professional results are built.
For small-scale use in a UK or Irish workshop, diode lasers are the most accessible entry point. They are compact, affordable, and capable of handling wood, leather, anodised aluminium, and opaque acrylic. CO2 lasers offer greater power and versatility, particularly for thicker materials and faster throughput, but they require more space and a larger initial investment. The xTool range, which we supply directly, covers both categories and is well suited to small business production.
Here is a practical checklist of what you need before your first engrave:
- Laser engraver (diode or CO2, appropriate for your material range)
- Safety goggles rated for your laser’s wavelength
- Air extraction or fume extractor (non-negotiable for indoor use)
- Fire-resistant work surface or honeycomb bed
- Test blanks (offcuts or cheaper versions of your chosen material)
- Masking tape (for protecting acrylic and reducing soot on wood)
- Isopropyl alcohol and lint-free cloths for cleaning
- Calipers for measuring material thickness accurately
Materials include wood, acrylic, stainless steel, anodised aluminium, and leather, each requiring different power and speed combinations, which is why having test pieces for every new material batch is essential rather than optional.
Workspace requirements for a small UK workshop are straightforward but critical. Ventilation must be adequate: fumes from burning wood and acrylic are not just unpleasant, they can be genuinely harmful over time. A dedicated fume extractor vented to the outside is the safest approach. Keep a fire extinguisher within arm’s reach and never leave an active engrave unattended.
Pro Tip: Set aside a small tray of scrap material from each new batch of blanks. Before engraving your actual stock, run a test burn on the scrap to confirm your settings are dialled in. Material thickness and density can vary between batches even from the same supplier, and a two-minute test burn can save an entire run of blanks from being wasted.
If you are still deciding on your overall production setup, the sublimation blanks selection guide offers a useful comparison of different blank types and processes that can help you plan your product range more strategically.
Step-by-step: How to engrave your laser blanks
Now that your tools and workspace are ready, let us walk through the engraving process step by step. Following this sequence consistently is what separates reliable results from hit-and-miss outcomes.
-
Inspect your blanks. Before placing anything in the machine, check every blank for warping, surface damage, or inconsistent thickness. A warped blank will cause uneven focus across the engraving area, resulting in blurry sections even if your settings are otherwise correct.
-
Prepare the surface. For wood, apply masking tape over the engraving area to reduce soot and make cleaning easier. For acrylic, leave the protective film on during engraving if possible, as it acts as a built-in mask. For metal, apply a laser marking spray if your machine requires it.
-
Set up your design software. Import your artwork, confirm dimensions match your blank size, and set the correct DPI for your material. Wood typically engraves well at 254 to 508 DPI. Fine detail on acrylic or metal may benefit from higher resolution settings.
-
Focus your laser accurately. Use the manufacturer’s focus tool or autofocus feature to set the correct focal distance for your material thickness. Even a 0.5mm error in focus can noticeably soften fine text or intricate linework.
-
Configure your power and speed settings. This is where material-specific knowledge matters most. For diode black acrylic, use 15 to 30% power, 2000 to 3500 mm/min speed, and a slight defocus of +0.5mm to avoid melting the surface. For Baltic birch at 3mm thickness on a 10W diode, a starting point of 60 to 70% power at 3000 mm/min is a reasonable baseline to test from.
-
Run a test engrave. Use your scrap piece to confirm the result before committing to your actual blank. Check depth, contrast, and edge sharpness.
-
Engrave your blank. Once satisfied with the test, place your blank securely, confirm it cannot shift during the job, and run the engrave.
-
Inspect and clean. After engraving, allow the blank to cool briefly before handling. Remove masking tape carefully, then clean with isopropyl alcohol and a lint-free cloth.
For heat-sensitive materials, multiple lighter passes consistently outperform a single heavy pass. This approach gives the material time to dissipate heat between passes, reducing the risk of scorching, melting, or cracking. The sublimation blanks checklist approach of methodical, step-by-step verification applies equally well to laser engraving workflows.
Pro Tip: Always engrave a small corner test on your actual blank before running the full design. Even after a successful scrap test, slight surface variations in the real blank can affect the result.
Troubleshooting and best practices
Even with precision at each step, challenges can surface. Here is how to solve common problems and ensure every engraving looks professional.
The most frequent issues and their solutions:
- Uneven engraving depth: Almost always caused by a warped blank or an unlevel work surface. Warped blanks cause uneven focus and must be flattened before engraving. Use shims or a honeycomb bed with hold-down pins to keep the blank perfectly flat.
- Blurry or soft edges: Check your focal distance first. If focus is correct, reduce your speed slightly to give the laser more dwell time on each pass.
- Excessive charring on wood: Lower your power or increase your speed. Using masking tape on the surface dramatically reduces soot spread and makes clean-up far easier.
- No mark on clear acrylic: Diode lasers transmit straight through clear acrylic without marking it. Switch to opaque or cast acrylic, or use a CO2 laser for clear materials.
- Foul-smelling or dangerous fumes: Stop immediately and check your material. Chrome-tanned leather produces toxic fumes and should never be engraved. Only vegetable-tanned leather is safe for laser use.
Never engrave PVC, chrome-tanned leather, or any material you cannot positively identify. The fumes from unsuitable materials are not just unpleasant; they can cause serious respiratory harm and damage your machine’s optics over time.
For consistently sharp results, keep these practices in mind: clean your lens regularly, replace worn belts or rails before they cause positioning errors, and always store your blanks flat to prevent warping before use. Exploring types of sublimation blanks can also help you understand how different blank formulations affect the final result across different production methods.
Pro Tip: Keep a settings log for every material and machine combination you use. Note the power, speed, passes, and result. After a few weeks, this log becomes an invaluable reference that eliminates guesswork entirely.
Finishing and quality control
Following successful engraving, it is time for thorough finishing and inspection to guarantee a product you can confidently deliver or sell.
Laser blanks are pre-cut, unfinished items designed for laser engraving to create custom products, which means the finishing stage is where you add the final layer of quality. Here is what a proper finishing process looks like:
- Inspect under good lighting. Check for missed areas, inconsistent depth, and any surface marks left by the engraving process. A desk lamp held at a low angle will reveal imperfections that are invisible under overhead lighting.
- Remove soot and residue. Wipe wood blanks with a dry cloth first, then follow with a light application of isopropyl alcohol if needed. For acrylic, a microfibre cloth and a small amount of acrylic-safe cleaner works well.
- Apply finishing treatments. Unfinished wood benefits from a light coat of clear wax, oil, or lacquer to protect the surface and deepen the engraved contrast. Anodised aluminium and acrylic generally need no finishing beyond cleaning.
- Sand if necessary. For wood blanks with slightly raised grain after engraving, a very light pass with 400-grit sandpaper followed by a wipe-down restores a smooth surface.
- Package professionally. For sublimation blanks for products and laser-engraved items sold commercially, presentation matters. Use individual clear bags, tissue paper, or small branded boxes to protect the product and reinforce your brand’s quality.
For small business sellers, quality control should be a formal step, not an afterthought. Set a standard for what constitutes an acceptable product and reject anything that falls below it. Customers who receive a flawless engraved item become repeat buyers. Those who receive a substandard one rarely return.
Why careful preparation trumps expensive equipment
Here is the perspective that most guides skip: the single biggest variable in laser engraving quality is not your machine. It is your preparation.
We have seen customers with entry-level diode lasers producing consistently stunning results on wood keychains and anodised badges, while others with significantly more expensive CO2 systems struggle to produce clean engravings because they skip material checks, ignore focus calibration, or rush straight into production without test burns. The machine is a tool. The operator’s discipline is the skill.
This matters enormously for small businesses and DIY enthusiasts because it means you do not need to spend thousands of pounds to produce professional results. What you need is a methodical approach, a willingness to test before you produce, and the patience to build a reliable settings library over time. The guide for craft businesses reinforces this point: understanding your materials and process deeply is what separates profitable custom product businesses from those that burn through stock and margins.
Expensive machines do have genuine advantages in speed, power, and versatility. But they amplify good technique, not poor technique. Invest in knowledge and preparation first. The equipment upgrade can come later, once you have mastered the fundamentals.
Explore high-quality laser blanks and supplies
Ready to put these techniques into practice with blanks you can trust? Sourcing quality materials is half the battle, and working with a reliable UK supplier makes a genuine difference to your consistency and profitability.

At Subli Blanks, we supply a wide range of laser-engraveable blanks with no minimum order quantities, which means you can order exactly what you need for your next project without committing to large volumes. Our range includes popular formats like the round MDF name badge and the rectangular MDF name badge, both ideal for personalised corporate gifts, event badges, and retail products. Whether you are just starting out or scaling up production, we have the blanks, equipment, and supplies to support your business at every stage.
Frequently asked questions
What are the best materials for laser engraving blanks?
Wood, acrylic, stainless steel, anodised aluminium, and leather are the most reliable options, each offering different aesthetics and engraving characteristics to suit different product types.
Why does my laser engraver fail to mark clear acrylic?
Diode on clear acrylic fails because the beam transmits straight through the material without being absorbed; switch to opaque or cast acrylic for reliable results with a diode laser.
How do I avoid warped blanks affecting my engraving?
Always inspect blanks before loading them into your machine, and flatten or shim warped blanks to maintain even focus across the entire engraving surface.
Is it safe to engrave all types of leather?
No. Chrome-tanned leather produces dangerous fumes when engraved and must be avoided entirely; only vegetable-tanned leather is safe for laser engraving.
What settings should I use for diode laser engraving black acrylic?
Start with 15 to 30% power, 2000 to 3500 mm/min speed, and a slight defocus of +0.5mm to prevent melting and achieve a clean, consistent result.


