


Essential guide to laser engravable blanks for UK makers
TL;DR:
- Choosing the right material depends on laser type, application, and desired finish.
- Focusing on mastering a few key materials builds consistency and a strong reputation.
- Sourcing blanks locally in the UK reduces delays, improves quality, and simplifies support.
Picking the right laser engravable blank can feel like choosing from a menu you’ve never seen before. You know you want to expand your product range, but the sheer number of materials, suppliers, and machine types makes the decision feel enormous before you’ve even switched on your laser. Whether you’re a hobbyist testing your first xTool machine or a small business owner trying to build a consistent product catalogue, the fundamentals are the same: common materials include wood, acrylic, metals, leather, and laminates, and matching those materials to your laser type is where results are won or lost. This guide cuts through the noise.
Table of Contents
- Understanding laser engravable blanks: materials, compatibility, and considerations
- What you need to start: sourcing blanks and essential preparation
- Step-by-step: how to laser engrave your blanks effectively
- Troubleshooting and quality control for professional results
- Our perspective: the real key to success with laser engravable blanks
- Expand your range with the right blanks
- Frequently asked questions
Key Takeaways
| Point | Details |
|---|---|
| Know your materials | Picking blanks that match your laser type and project goal saves time and money. |
| Source smart | Reliable, local suppliers ensure quality and reduce waste for UK and Ireland creators. |
| Prioritise preparation | Properly prepping blanks and testing before full runs prevents costly errors. |
| Maintain consistency | Repeatable settings and a quality routine help deliver professional results every time. |
Understanding laser engravable blanks: materials, compatibility, and considerations
A laser engravable blank is simply a pre-made item or sheet of material that’s been prepared to receive a laser-engraved design. Unlike sublimation, which transfers ink using heat and pressure, laser engraving physically removes or alters the surface of the material. Understanding what a printing blank actually is helps clarify why not every material behaves the same way under a laser.
The most common materials you’ll work with fall into a few key categories:
- Wood and wood-based boards (plywood, MDF, bamboo): Affordable, beginner-friendly, and widely available. They produce a warm, charred contrast that customers love on personalised gifts.
- Acrylic: Cast acrylic engraves beautifully with a frosted finish; extruded acrylic is better for cutting. Never confuse the two.
- Anodised aluminium and stainless steel: Produce sharp, permanent marks with a professional look. Ideal for tags, trophies, and signage.
- Leather: Natural leather engraves with a distinctive burned tone. Faux leather is more consistent but requires careful power settings.
- Laminates: Two-layer materials (coloured top, contrasting core) designed specifically for engraving. Perfect for signs and labels.
Machine compatibility is arguably the most important factor. CO2 lasers suit non-metals like wood, acrylic, and leather, while fibre and diode lasers are the go-to for metals. Running the wrong material through the wrong machine wastes blanks and can damage your equipment.
| Material | Compatible laser | Popular uses |
|---|---|---|
| MDF / plywood | CO2, diode | Signs, gifts, décor |
| Cast acrylic | CO2 | Awards, displays, keyrings |
| Anodised aluminium | Fibre, diode | Tags, badges, labels |
| Stainless steel | Fibre | Jewellery, tools, trophies |
| Leather | CO2, diode | Wallets, keyrings, patches |
| Laminate | CO2 | Name badges, plaques |
If you’re still weighing up whether laser engraving is the right fit alongside what are custom blanks you might already be using, it’s worth comparing the output quality and production speed for your specific product line.
Pro Tip: Always request a material safety data sheet (MSDS) from your supplier before engraving any new blank. Some coatings and adhesives release harmful fumes when lasered, which ventilation alone may not safely manage.
What you need to start: sourcing blanks and essential preparation
With knowledge of materials and machine compatibility sorted, let’s get practical with sourcing and prepping your blanks. Finding affordable, quality blanks in the UK or Ireland is easier than it once was, but it still pays to be selective.

UK-based wholesale suppliers offer faster shipping, no customs hassle, and consistent quality standards. Overseas suppliers (often based in China or the US) can offer lower unit prices but introduce risks around delays, quality variation, and import duties. Here’s a quick comparison:
| Factor | UK/Ireland supplier | Overseas supplier |
|---|---|---|
| Delivery speed | 1 to 3 days | 1 to 4 weeks |
| Quality consistency | High | Variable |
| Minimum order | Often none | Sometimes high MOQ |
| Import duties | None | Possible |
| Returns/support | Easy | Complicated |
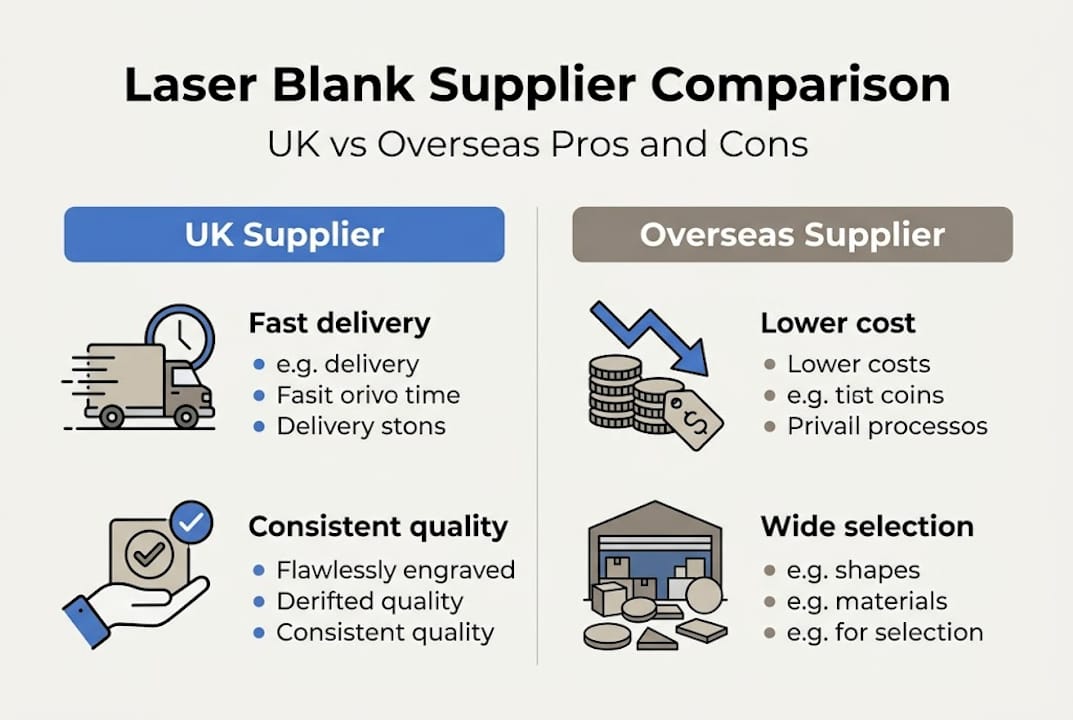
For most small businesses and hobbyists, a local or UK-based wholesaler wins on almost every practical point. You won’t wait weeks for stock, and if there’s an issue, resolving it is straightforward.
Once your blanks arrive, preparation makes a real difference to results. Material match to laser type is critical for safety and quality, but so is the physical state of the blank before engraving begins. Follow these steps:
- Measure your blanks carefully. Even small size inconsistencies can throw off your design placement.
- Clean the surface with a lint-free cloth. Dust and grease cause uneven engraving and residue build-up.
- Apply masking tape to wood and some acrylics before engraving to reduce scorching and keep edges clean.
- Run a safety check on your workspace: ventilation on, fire extinguisher accessible, loose materials away from the laser path.
- Set up a test piece of the same material before committing to your full batch.
Looking to reduce waste with sublimation blanks alongside your laser work? Applying the same test-first mindset across both processes saves significant money over time. Reading up on the essential guide to sublimation blanks is a smart next step if you’re running both workflows.
Pro Tip: Order a small test batch of any new blank before committing to volume. A £10 trial run now can save you from a £200 write-off later.
Step-by-step: how to laser engrave your blanks effectively
After sourcing and prepping, it’s time for the actual engraving. Here’s how to get started safely and confidently.
- Design and layout: Use your laser software (LightBurn is popular) to size and position your artwork. Always set your canvas to match your blank’s exact dimensions.
- Set up your laser: Input your starting speed, power, and frequency settings based on the material. If in doubt, refer to your machine’s material library or supplier notes.
- Align your blank: Use the laser’s pointer or framing function to confirm the design sits exactly where you want it on the blank.
- Set the focus: Adjust the focal distance correctly. An out-of-focus beam produces fuzzy lines and weak engraving depth.
- Run a test: Engrave a small section or corner first at low power. Check depth, contrast, and edge quality before proceeding.
- Full engrave: Once satisfied with the test, run the full job. Stay present and never leave a running laser unattended.
- Finishing: Remove masking tape slowly at an angle, clean residue with a soft cloth, and inspect the result in good lighting.
Safety note: Always run your laser in a well-ventilated space or with proper fume extraction fitted. Wear appropriate eye protection rated for your laser’s wavelength. Never engrave PVC or vinyl-coated materials, as these release chlorine gas.
For metals, remember that CO2 lasers suit wood and acrylic while diode and fibre lasers handle most metals. Pushing your CO2 laser onto bare steel won’t produce results and risks damaging the lens.
Common issues to watch for:
- Incomplete engrave: Power too low or speed too high. Slow down or increase power in small steps.
- Burning or charring beyond the design: Speed too low or power too high. Adjust accordingly and re-mask the surface.
- Missed alignment: Check that the blank hasn’t shifted. Use jigs or tape to hold pieces in position.
- Uneven depth: Surface may not be level. Use a honeycomb bed or shims to raise low spots.
Using a sublimation blanks selection guide as a reference for how other blank types are optimised can help you think systematically about your laser settings too.
Troubleshooting and quality control for professional results
With your first projects complete, maintaining professional quality is your next challenge. One inconsistent batch can affect your reputation, so a simple quality control (QC) routine is worth building from the start.
The most frequent problems and their quick remedies:
- Burn marks around the design: Reduce power, increase speed, or apply masking tape before engraving. For wood, a light sand after engraving can clean edges.
- Weak or faint engrave: Increase power slightly or reduce speed. Check that your lens is clean and your focus is correct.
- Residue or sticky deposits on acrylic: Peel masking immediately after engraving while still warm. Use isopropyl alcohol on a cloth to clean.
- Inconsistent finish across the batch: Check that all blanks are from the same production run. Thickness and coating variations between batches cause different results even at identical settings.
- Discolouration on leather: Lower your power. Leather scorches easily, and less is almost always more.
Matching material and machine settings is crucial for consistent, high-quality results, particularly when you’re producing items for paying customers who expect identical pieces.
A simple QC routine looks like this: inspect each piece in daylight or under a bright lamp, clean surfaces before packaging, and keep two or three test samples from every new material batch as reference points. If a customer raises a query, you can compare their item against your retained samples.
Using a sublimation blanks checklist as a model, you can build your own laser engraving checklist that covers machine settings, prep steps, and QC criteria for each material type you regularly use.
Pro Tip: Keep a settings log for every material you engrave. Record speed, power, passes, and result notes. This single habit can cut setup time by half when you return to a material weeks later.
Know when to discard rather than rework. If a blank has scorched beyond the design area or the surface has lifted, no amount of cleaning will make it sellable. Rework is only viable when the issue is minor surface residue or a small misalignment on a non-critical area.
Our perspective: the real key to success with laser engravable blanks
There’s a temptation, especially when you’re new to laser engraving, to buy a little of everything: six different wood types, three acrylics, some leather, a few metal cards. It feels productive. In practice, it fragments your attention and means you never develop real fluency with any single material.
The makers who build sustainable small businesses from laser engraving almost always do the opposite. They pick two or three materials they understand deeply, build strong supplier relationships for those specific blanks, and get very good at producing consistent results. Their customers notice. Reliability is a competitive advantage that no amount of trend-chasing can replicate.
It’s also worth remembering that benefits of sublimation blanks and laser engraving blanks often overlap in business applications. The most resilient small product businesses tend to combine both processes rather than betting everything on one technique.
Focus before variety. Master before you expand.
Expand your range with the right blanks
Ready to put this guide into action? Finding a reliable UK supplier takes much of the guesswork out of sourcing.

At SubliBlanks Ltd, we supply a wide range of laser engravable blanks and supplies for small businesses and hobbyists across the UK and Ireland, with no minimum order quantities. That means you can trial new materials without committing to bulk. From wood and acrylic to metals and laminates, we stock what you actually need to grow your product range. If you’re looking for something a little different, our blank bar mats are a brilliant addition to any personalised gift or hospitality product line. Explore our full range and start your next project with confidence.
Frequently asked questions
Can I use MDF blanks with a CO2 laser for engraving?
Yes, MDF blanks are well suited to CO2 laser engraving because their uniform composition produces consistent, clean results. CO2 lasers are ideal for non-metal materials like MDF, making them a reliable pairing for beginners and experienced makers alike.
What’s the safest way to test new laser settings on unknown materials?
Always use a scrap piece of the same material and begin with lower power and higher speed settings, increasing gradually until you achieve the desired result. Safety and test runs are critical when working with any new or unfamiliar material.
Where can I source affordable laser engravable blanks in the UK?
UK-based wholesale suppliers and specialist online retailers offer affordable, consistent options for small batches with no minimum order requirements. Buying locally also avoids customs delays and makes returns straightforward if quality issues arise.
How can I avoid burnt edges when engraving acrylic?
Ensure correct focal distance, use air assist if your machine supports it, and apply masking tape to the surface before engraving. Adjusting settings for each material prevents burning and produces clean, professional edges every time.
Recommended
- What are custom blanks? A UK guide for creatives – SubliBlanks Ltd
- Sublimation Blanks Selection Guide 2026: Cut Waste 25% – SubliBlanks Ltd
- UK Wholesale Sublimation & Laser Supplies – SubliBlanks Ltd
- Types of sublimation blanks: reduce waste by 25% in 2026 – SubliBlanks Ltd
- Laser Engraving | Tungsten Creek Tactical


