



Start DTF Curing at 140–160°C and Calibrate in 5 Minutes
Start powder curing between 140 and 160°C (285 to 320°F), with the exact time depending on your equipment. Finish pressing runs hotter and shorter: 149 to 163°C (300 to 325°F) for cotton, less for polyester. Neither number is gospel. The display on your oven or press tells you what it thinks the temperature is, not what the film is actually experiencing, so every setting below is a starting point you confirm by eye, not a fixed rule.
TL;DR:
- Curing temperatures should be carefully calibrated and confirmed with test strips rather than relying on oven or press displays, as they may not reflect actual film conditions.
- Different curing methods, such as conveyor dryers, standalone ovens, or heat-press hover, require distinct temperature and time settings to prevent under- or over-curing.
- Finishing on cotton typically needs 149 to 163°C (300 to 325°F) for 10 to 15 seconds, while polyester requires cooler settings of 132 to 141°C (270 to 285°F) for 10 to 12 seconds.
- Regular calibration and cold wash testing improve process consistency, especially when switching equipment or materials, reducing the risk of peel failure or dye migration.
- Proper storage of film and powder, along with documented test results, helps maintain stable curing conditions and reduces trial-and-error during production.
Table of Contents
- DTF curing temperature and time by method
- Heat-press finishing settings by fabric type
- How to test and calibrate your curing setup
- Reading the surface: how to spot under-cure and over-cure
- Common curing problems and how to fix them
- Choosing and maintaining your curing equipment
- Process control that actually prevents cure failures
- When to run cooler and longer versus hotter and faster
- Getting the right supplies for consistent DTF cures
- Sources
- FAQ
DTF curing temperature and time by method
The single biggest mistake in DTF production is treating “curing temperature” as one number that applies everywhere. It doesn’t. A conveyor dryer, a standalone curing oven, a heat-press hover, and a flash dryer all melt adhesive powder differently, and each demands its own combination of heat and dwell time.
Conveyor dryers and production ovens run at the gentle end of the scale because the film moves continuously through a heated tunnel. Expect 132 to 149°C (270 to 300°F) for roughly 2 to 3 minutes of total exposure, with belt speed doing the fine-tuning rather than the thermostat. Slow the belt if the powder still looks sandy at the exit; speed it up if edges start browning.
Standalone curing ovens give you more control because the print sits still while hot air circulates around it. A practical starting point is around 150°C (302°F), held for 2 to 5 minutes depending on how hot the chamber actually runs. Lower temperatures need the longer end of that window; push past 160°C and you’re often done in closer to 2 minutes, but you’re also closer to scorching if you get distracted.
Heat-press hover curing (holding the platen a few millimetres above the film rather than pressing down) works well for small runs where you don’t own a dedicated oven. Because the heat is more direct, it needs less time. Set the platen to a similar range as your oven target, hover for 10 to 20 seconds, and never let the press actually touch the wet powder, or you’ll drag it and ruin the print. This method rewards a steady hand more than a precise number.
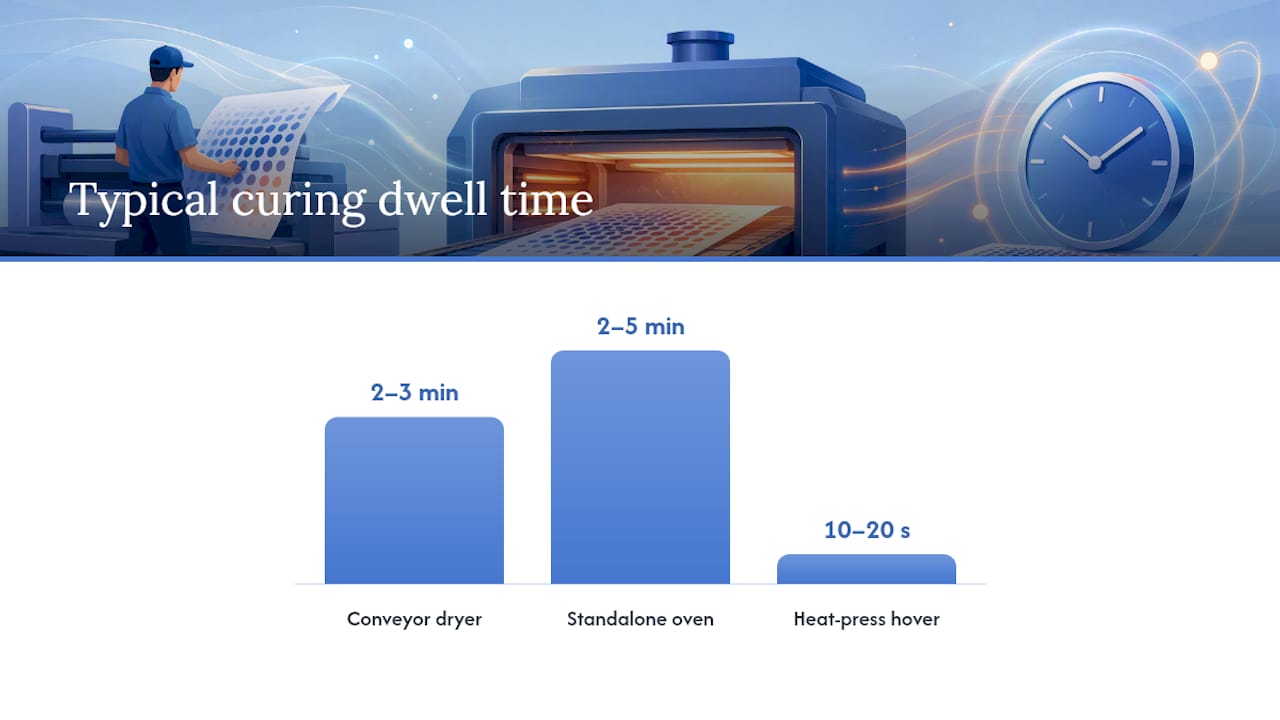
Flash dryers and heat guns cure fast and hot, which suits one-off transfers or spot fixes rather than volume production. Conveyor and hover methods sit at opposite ends of the same trade-off: the higher the heat, the less room you have for error, so keep the source moving and check the film every few seconds rather than leaving it under a fixed dwell.
Whichever method you use, three habits matter more than any dial number: preheat equipment thoroughly before production, verify actual temperature where the film sits with an independent thermometer, and keep sheets flat and spaced to avoid powder clumping or overlapping during curing.
| Method | Typical temperature | Typical time |
|---|---|---|
| Conveyor dryer / production oven | 132–149°C (270–300°F) | 2–3 minutes |
| Standalone curing oven | 140–160°C (285–320°F) | 2–5 minutes |
| Heat-press hover | 140–160°C (285–320°F) | 10–20 seconds |
| Flash dryer / heat gun | Higher, short bursts | Seconds, monitored continuously |
Heat-press finishing settings by fabric type
Curing melts the powder onto the film. Finishing presses the transfer onto the garment, and that’s a separate temperature decision entirely, because now fabric chemistry is in play alongside the adhesive.
For 100% cotton, heat-press finishing charts commonly recommend 149 to 163°C (300 to 325°F) for 10 to 15 seconds at medium-firm pressure. Peel type depends on the film: some products are designed for a hot peel straight off the press, others want to cool first. Always check the film’s own data sheet rather than assuming, because many modern DTF films are formulated to work with either peel method, and guessing wrong is a common cause of half-lifted designs.
Polyester and other performance fabrics need a noticeably cooler press, around 132 to 141°C (270 to 285°F), for 10 to 12 seconds. Cold peel is the safer default here. Push the heat too high on polyester and you risk dye migration, where dye from the fabric bleeds up into the white ink layer of the transfer and leaves a pink or grey haze that no amount of pressing will fix afterwards.
Blends and delicate or stretch fabrics sit between the two. Drop the temperature and shorten the dwell compared with pure cotton, and go lighter on pressure so you don’t leave a permanent platen mark on thin jersey. Run a test swatch before committing to a full order, particularly on anything with elastane content.
Heavy fabrics like fleece or canvas can usually tolerate a slightly longer dwell or firmer pressure to get full contact through the thicker weave, but watch closely for scorching, since a heavier fabric also holds heat longer after the platen lifts.
| Fabric family | Temperature | Time | Peel |
|---|---|---|---|
| 100% cotton | 149–163°C (300–325°F) | 10–15 s | Hot or cold, per film |
| Polyester / performance | 132–141°C (270–285°F) | 10–12 s | Cold |
| Blends / delicates | Lower end of cotton range | 8 to 12 s | Test first |
| Heavy fabrics (fleece, canvas) | Upper cotton range | Up to 15 s | Per film |
A quick finish press, roughly 10 seconds at around 150°C with a parchment cover sheet, can also improve hand feel and wash durability on some films after the main transfer. It’s a useful trick, but it adds another heat cycle, so it raises the same dye migration risk on polyester and should be used sparingly there.
How to test and calibrate your curing setup
Every oven and press runs slightly differently, even two units of the same model, so a five-minute calibration protocol saves hours of wasted film later.
- Cut three or four small test strips of scrap film with powder applied, and label each one with the setting you’re about to try, for example 145°C, 150°C, and 155°C, or 60, 90, and 120 seconds if temperature is fixed.
- Place a calibrated thermometer where the actual film sits, not just wherever the built-in sensor reads, and note the difference between the display and the real reading.
- Run each strip at its labelled setting and let it cool fully before handling.
- Inspect the surface. You’re looking for the shift from a matte, grainy texture to a smooth, slightly glossy finish across the whole sheet, not just the centre.
- Wash test the winning strip. Apply it to a scrap swatch, put it through three normal wash cycles, and check for cracking, lifting, or dulling.
- Record the working combination on your equipment and in your process notes so the next operator doesn’t have to repeat the whole test.
Pro Tip: Keep a small binder or spreadsheet of every successful test strip by machine and film brand. When you switch powder suppliers or replace an oven, you’ll already have a documented starting point instead of guessing from zero.
Reading the surface: how to spot under-cure and over-cure
A correctly cured transfer looks smooth and slightly glossy, with no gritty texture under a fingertip, and the film should flex without cracking. That visual shift from sandy to smooth is the most reliable signal you have, more dependable than trusting a set time or temperature alone.
Under-cured film still looks grainy or matte after the cycle finishes, sheds a fine powder residue, and tends to pick up lint before you’ve even applied it. In wash tests it starts peeling at the edges within the first few washes. The fix is straightforward: add a little more time or a few degrees of heat and retest.
Over-cured film tells you in more dramatic ways: yellowing or browning of the adhesive, a burnt smell, visible smoke, a brittle feel that cracks when flexed, or the film itself warping out of shape. Both under and over curing leave distinct symptoms that are easy to tell apart once you know what to look for. Drop the temperature by a few degrees or shorten the dwell, and check your equipment for hot spots if only one area of the sheet is affected.
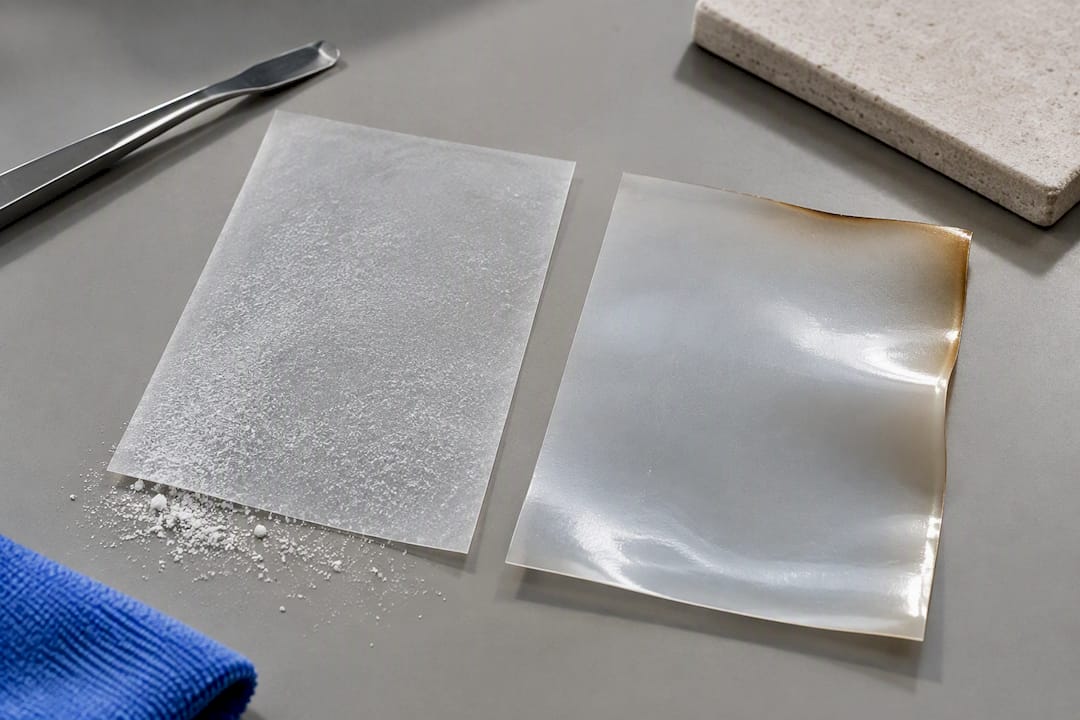
A single wash test after three cycles is usually enough to confirm a setting holds up before you commit to a full production run.
Common curing problems and how to fix them
Most curing failures trace back to one of four causes, and diagnosing which one saves a lot of trial and error.
- Peeling after washing usually means the cure was too light. Check the powder mesh size against your film, then increase time or temperature in small steps and re-run the wash test.
- Yellowing or browning points to too much heat. Reduce the temperature by 5 to 10°C (10 to 20°F), and check whether your powder has aged past its useful shelf life, since older stock can cure unpredictably.
- Uneven curing across the sheet is often an airflow or spacing problem. Check that sheets aren’t overlapping, that conveyor belts are calibrated to actual speed rather than a dial setting, and that oven fans aren’t blocked.
- Dye migration on polyester shows up as a pink or grey haze under white ink after finishing. Lower the finish-press temperature and switch to a cold peel where the film allows it.
Fixing any of these usually means adjusting one variable at a time and confirming the change with a fresh test strip rather than guessing at a full production run.
Choosing and maintaining your curing equipment
The right equipment depends less on budget and more on volume and consistency needs. A single heat-press hover is perfectly adequate for a hobbyist running a few dozen transfers a week, but it asks a lot of the operator’s timing and attention on every single sheet. A dedicated curing oven removes that human variable and pays for itself once you’re running enough film that operator fatigue starts creeping into quality. A conveyor dryer earns its keep only at genuine production volume, where consistent belt speed and continuous throughput outweigh the upfront cost.
Whatever you run, build a maintenance habit around it. Check thermometer placement periodically, since sensors drift over months of use. Confirm platen evenness on a heat press, because uneven pressure cures one side of a print while leaving the other under-done. Set a recurring calibration check, monthly for a busy shop, so a slowly drifting oven doesn’t quietly ruin a week’s orders before anyone notices the pattern in customer returns.
Process control that actually prevents cure failures
Consistent cures start before the oven even switches on. Store DTF film at 15 to 24°C and 40 to 55% relative humidity; outside that range, powder can absorb moisture or behave unpredictably under heat, which shows up later as inconsistent adhesion you’ll wrongly blame on your press settings. Keep a simple checklist running in the shop: fresh powder, labelled test strips on file, a calibrated thermometer, and humidity control in the workspace. When a wash test comes back with early peeling, feed that result straight back into your standard settings rather than treating it as a one-off.
When to run cooler and longer versus hotter and faster
Lower-temperature, longer cures suit delicate films and mixed-substrate shops, because the gentler ramp reduces the risk of warping when you’re switching between fabric types daily. Higher-temperature, shorter cures make sense for heavy-duty fabric runs and high-throughput shops, but only once the oven or conveyor is properly calibrated, since a fast cycle leaves almost no margin for a hot spot or a display that’s drifted out of sync with reality.
Given the choice, favour whichever setting you’ve actually documented and tested over one that’s marginally faster on paper. A repeatable process that takes an extra thirty seconds beats a tight cycle that occasionally fails a wash test, because every failed batch costs more time than the seconds it saved.
— chris
Getting the right supplies for consistent DTF cures
Good settings only get you so far without consistent film, powder, and equipment behind them. Trade customers can pick up a small batch of test film and powder to run a calibration protocol before committing to a bulk order.

The DTF consumables range covers films and powders suited to the mesh sizes and adhesive types discussed above, and pairing them with a properly calibrated press from the heat press and printer collection removes one more variable from the equation. If you’re setting up test strips for the first time, order a small run of film and powder, work through the calibration steps, and scale up once you’ve got a setting that survives the wash test.
Sources
The ranges and methodology in this guide draw on published curing and finishing charts, including the heat transfer powder curing guide from BCH Technologies, the DTF powder and temperature charts from DTF Database, and equipment-specific guidance from XC Inkjet. These are cited as reference material, not product endorsements.
- Heat transfer powder curing guide: recommended temperature, press settings and bake time (BCH Technologies)
- DTF heat press temperature chart: time & temp by fabric (DTF Database)
- Curing DTF powder (XC Inkjet)
FAQ
What temperature should DTF transfers be set to?
Powder curing typically starts between 140 and 160°C (285 to 320°F), while finish pressing runs 149 to 163°C (300 to 325°F) for cotton and 132 to 141°C (270 to 285°F) for polyester. Always confirm the actual setting with a test strip rather than relying on the display alone.
How long do you let DTF cool before peeling?
Cooling time depends on the film’s peel type: hot-peel films can be lifted almost immediately after the press, while cold-peel films need to reach room temperature first to avoid lifting ink or adhesive. Check the specific film’s data sheet, since many films are formulated for either peel method.
Do I need a curing oven for DTF?
A dedicated curing oven isn’t essential for small or occasional runs, since a heat-press hover or a flash dryer can cure powder effectively at low volume. Once you’re running consistent daily volume, an oven gives more repeatable results because it removes the timing variability of manual hovering.
What temperature should I use for DTF heat transfer on 100% cotton?
Cotton finish pressing typically runs 149 to 163°C (300 to 325°F) for 10 to 15 seconds at medium-firm pressure. The correct peel, hot or cold, depends on the specific film, so test a swatch before running a full order.


