



How to create custom stamps: a crafter's guide
TL;DR:
- Creating custom stamps involves selecting appropriate materials and designing with bold, simple shapes due to their binary printing nature. Proper carving techniques and test impressions ensure crisp, consistent results, while sharpening tools and correct ink use prevent common issues like smudging or bleeding. Success depends on understanding design standards, careful preparation, and maintaining tools for high-quality, durable stamps.
Custom stamps are physical printing tools that transfer a repeatable design onto paper, fabric, card, or other surfaces using ink. Learning how to create custom stamps gives you a personalised mark that no shop-bought stamp can replicate. The process combines good design thinking with practical carving or production techniques. Get both right, and you end up with a stamp that produces crisp, consistent impressions across dozens of projects. This guide covers the materials you need, the design principles that matter most, and the step-by-step carving process that turns a sketch into a working stamp.
What tools and materials do you need to create custom stamps?
The right materials determine whether your stamp lasts ten impressions or ten thousand. Choosing poorly at this stage costs you time and produces weak results.
Carving blocks and rubber
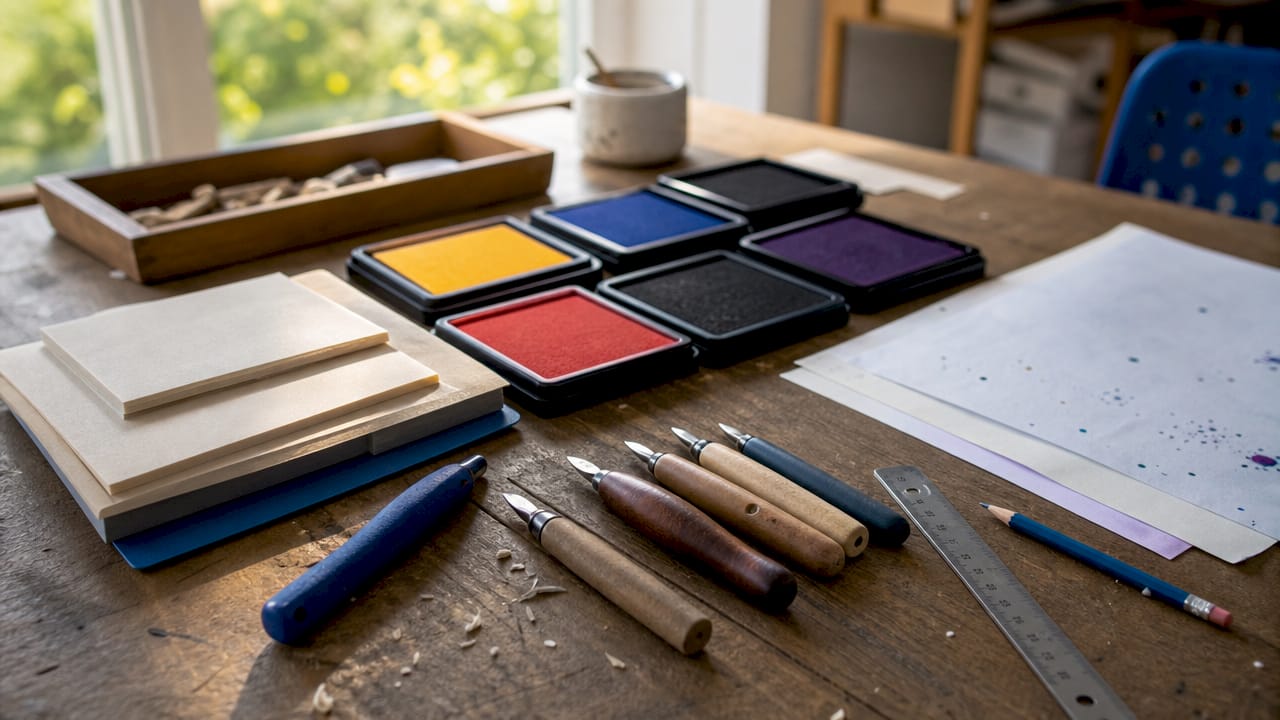
Soft carving blocks made from PVC or natural rubber are the standard choice for hand-carved stamps. PVC carving blocks, such as Speedball Speedy-Carve, cut cleanly and hold fine detail well. Natural rubber is firmer and suits bold, simple designs. Avoid foam sheets for anything other than very rough, large-scale work. They compress unevenly and produce blotchy impressions.
Carving tools
A basic lino-cutting set with interchangeable blades covers most needs. You will use:
- A fine V-gouge for detailed lines and lettering
- A wider U-gouge for clearing large areas of negative space
- A straight blade for clean edges and corners
- A cutting mat to protect your work surface
Inks and pads
Dye-based inks dry quickly and suit smooth paper. Pigment-based inks give richer colour on textured surfaces and are the better choice for card stock. Specialty inks handle fabric and non-porous materials where standard pads fail.
Supporting materials
Transfer paper or graphite paper moves your design from the printed page onto the carving block. A ruler, pencil, and low-tack tape keep everything aligned during transfer. A wooden block or acrylic mount gives the finished stamp a stable handle.
Pro Tip: Buy a pack of spare blades before you start. A fresh blade on your first cut makes a bigger difference to the result than any other single factor.
| Material | Best use |
|---|---|
| PVC carving block | Fine detail, lettering, intricate designs |
| Natural rubber block | Bold, simple shapes and logos |
| V-gouge blade | Thin lines, text outlines |
| U-gouge blade | Clearing large background areas |
| Pigment ink pad | Card, fabric, and textured surfaces |
How do you design an effective custom stamp?
Stamp design follows one non-negotiable rule: stamps produce binary impressions, meaning ink is either fully present or completely absent. Gradients, shadows, and grey tones do not reproduce. That rule shapes every design decision you make.
Start with a paper sketch
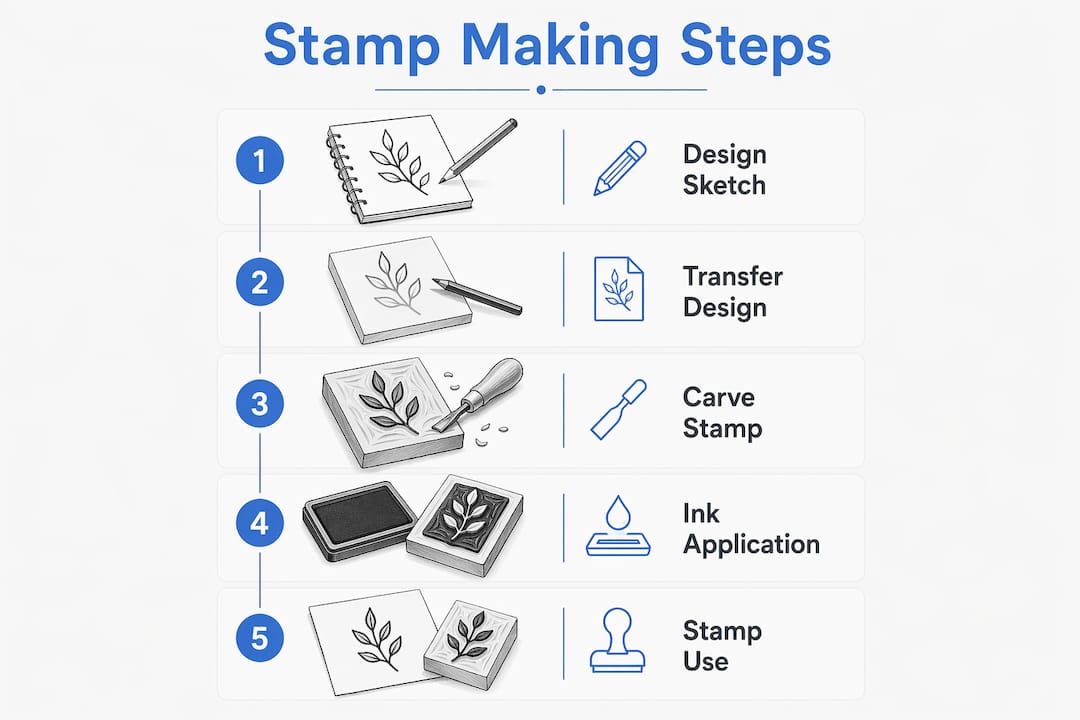
Sketching on paper first forces you to think in solid shapes rather than shaded illustrations. It is far easier to spot over-complex areas on a rough sketch than after you have spent an hour carving. Aim for bold outlines, clear negative space, and no fine crosshatching. If a detail looks fiddly on paper, it will be impossible to carve cleanly.
Apply professional size and weight standards
Professional stamp design standards set a minimum font size of 8pt for standard text and 14pt for reverse (white on dark) text. Line weight must be at least 1pt. Anything thinner breaks during carving or collapses under stamping pressure. These are not suggestions. They are the thresholds below which legibility fails.
Work at the actual finished size of your stamp. Designing at twice the size and then scaling down is a common mistake. Details that look fine at double size become uncarveably thin at true size.
Prepare your digital artwork correctly
Vector formats, such as SVG or AI files, scale without quality loss and are the preferred format for stamp production. If you are working with raster images, use at least 300 DPI, with 600 DPI as the standard for professional clarity. Blurry artwork produces blurry stamps.
Convert all fonts to outlines before saving your file. This converts text into fixed shapes, preventing font substitution when the file is opened on a different machine or sent to a manufacturer. Missing fonts are one of the most common causes of production errors.
Pro Tip: Print your design at actual stamp size and stamp it onto paper with a marker pen. This gives you a realistic preview of how the final impression will look before you carve a single line.
| Design element | Minimum standard | Why it matters |
|---|---|---|
| Font size (standard) | 8pt | Below this, text becomes illegible after carving |
| Font size (reverse) | 14pt | Thin reversed text fills in with ink |
| Line weight | 1pt | Thinner lines break or collapse under pressure |
| Image resolution | 300 DPI | Prevents blurring in the carved surface |
| File format | Vector (SVG/AI) | Scales without quality loss |
Step-by-step guide to carving your own rubber stamp
Hand-carving is the most accessible way to make personalised stamps at home. The process takes patience, but the results are genuinely satisfying.
-
Print your design in reverse. Stamps produce a mirror image of the carved surface. Print your design flipped horizontally so the final impression reads correctly.
-
Transfer the design to the block. Place the printed design face-down onto the carving block. Rub the back firmly with a pencil or burnishing tool. The toner transfers a faint outline onto the rubber. Graphite transfer paper works equally well for hand-drawn designs.
-
Outline the design with a fine blade. Use your V-gouge to cut along the edges of every element you want to keep. Cut at a slight inward angle so the raised areas have a stable base. Do not rush this step.
-
Remove the negative space. Switch to the U-gouge and clear away all the rubber surrounding your design. Work in small sections. The raised areas that remain will hold the ink and produce the impression.
-
Test the stamp. Press the carved block onto an ink pad and make a test impression on scrap paper. Test impressions on various surfaces reveal high spots and uncarved areas that need attention. Mark any problem areas with a pencil directly on the block.
-
Refine and repeat. Return to the block and remove any high spots or stray rubber. Make another test impression. Repeat until the impression is clean and consistent.
-
Mount the stamp. Attach the finished block to a wooden handle or acrylic mount using strong adhesive. A stable handle gives you better control and more even pressure during stamping.
Test impressions are not optional. Every experienced stamp maker makes at least three or four before considering a stamp finished. The difference between a good stamp and a great one is almost always found in that refinement stage.
Pro Tip: Carve away from your fingers at all times. Rotate the block rather than repositioning your hand. This one habit prevents the most common carving injuries.
How do you troubleshoot a custom stamp’s performance?
Even a well-carved stamp produces poor results if used incorrectly or paired with the wrong ink. Knowing what causes each problem lets you fix it quickly.
Common problems and their causes
- Smudging: Usually caused by rocking the stamp during application. Press straight down and lift straight up. Any lateral movement smears the impression.
- Uneven impressions: High spots on the carving block touch the surface before the rest of the design. Return to the block and carve those areas down slightly.
- Weak or missing lines: The line was carved too thin and has collapsed, or the ink pad is dry. Re-ink the pad and test again. If the line is gone, the design needs to be adjusted.
- Ink bleeding on fabric: The ink type does not suit the surface. Match ink type to surface material. Pigment-based inks suit paper and card. Fabric inks contain binders that prevent bleeding on textile fibres.
Cleaning and maintaining your stamp
Clean rubber stamps with a damp cloth or a dedicated stamp cleaner after each use. Dried ink clogs the fine detail in the carved surface and degrades impression quality over time. Store stamps face-up or in a case to prevent the rubber from picking up dust and debris.
Sharp tools and frequent blade replacement are vital for clean carving. Dull blades tear the rubber rather than cutting it cleanly. They also require more force, which increases the risk of slipping. Replace blades regularly, not just when they feel blunt.
Pro Tip: Keep a dedicated ink pad for each colour you use regularly. Cross-contamination between colours muddies impressions and is difficult to clean out of a pad completely.
Key takeaways
Creating custom stamps successfully depends on designing for the binary nature of stamp impressions and carving with sharp, well-maintained tools.
| Point | Details |
|---|---|
| Design in solid shapes only | Stamps cannot reproduce gradients; use bold outlines and clear negative space. |
| Follow minimum size standards | Use at least 8pt font and 1pt line weight to maintain legibility after carving. |
| Prepare digital files correctly | Convert fonts to outlines and use vector formats or a minimum of 300 DPI for raster images. |
| Test impressions drive refinement | Make multiple test prints and carve back problem areas before considering the stamp finished. |
| Match ink to surface | Pigment inks suit paper and card; specialty inks are required for fabric and non-porous surfaces. |
What I have learned from years of stamp making
The single most common mistake I see from crafters starting out is treating stamp design like any other illustration. They bring in a detailed drawing with fine shading, subtle curves, and small text, then wonder why the carved result looks nothing like the original. The binary rule is not a limitation to work around. It is the design brief. Once you accept that, your designs improve immediately.
The second thing I would tell any beginner is to sketch on paper before touching a screen. I know it feels old-fashioned, but sketching first aids in prioritising binary stamp design in a way that digital tools simply do not. When you draw with a pen, you naturally think in lines and fills. When you design on a computer, you reach for gradients and effects without thinking.
Tool maintenance is the other area where beginners consistently underestimate the impact. A sharp blade does not just produce cleaner cuts. It gives you control. You can guide a sharp blade. A dull one goes where it wants. I replace blades far more often than most people think necessary, and the quality difference is visible in every single cut. If you want to understand the full range of production options beyond hand-carving, the stamp making machine types guide from Subliblanks is worth reading before you invest in equipment.
— chris
Subliblanks has the supplies to get you started
Subliblanks supplies stamp-making machines, carving materials, and a full range of accessories for crafters who want professional results without a minimum order requirement. Whether you are making your first hand-carved stamp or scaling up to machine production, the right materials make the difference between a stamp that lasts and one that falls apart after a dozen uses.

The Subliblanks online store stocks stamp-making equipment alongside inks, carving blanks, and supporting supplies. You can also find custom stamp design guidance to help you move from concept to finished stamp with confidence. No minimum orders mean you can trial materials before committing to larger quantities.
FAQ
What is the easiest material to carve for a beginner stamp?
PVC carving blocks, such as Speedball Speedy-Carve, are the easiest starting material. They cut cleanly with minimal force and hold fine detail better than natural rubber or foam alternatives.
What file format should I use when designing a stamp digitally?
Vector formats such as SVG or AI are the preferred choice. If you use raster images, 300 DPI is the minimum acceptable resolution, with 600 DPI recommended for professional clarity.
Why does my stamp produce smudged impressions?
Smudging is almost always caused by rocking or sliding the stamp during application. Press straight down and lift straight up without any lateral movement to produce a clean impression.
Do I need to mirror my design before carving?
Yes. The carved surface produces a mirror image of itself when stamped. Always print or transfer your design in reverse so the final impression reads correctly.
How do I stop ink bleeding on fabric?
Use a fabric-specific ink that contains textile binders. Standard dye or pigment inks are not formulated for fabric and will bleed along the fibres, producing blurry edges.


