



Badge machine sizes: match dies, blanks and holders from 25mm to 75mm
Most badge presses run on standard round dies: roughly 25mm (about 1 inch), roughly 32mm (approximately 1.25 inches), approximately 37mm, approximately 44mm, about 58mm (around 2.25 inches) and occasionally approximately 75mm (about 3 inches). Some machines take one die only; others accept swappable sets. As a rule of thumb, go bigger (58mm or above) for readability and QR codes, smaller (25 to 32mm) for giveaways, staff lanyards or merchandise where you need volume over visibility.
TL;DR:
- Badge sizes of 25mm and 32mm are ideal for high-volume giveaways and merchandise, but lack visibility for QR codes or detailed designs.
- Most presses support 58mm badges, which are suitable for retail promotions and large event badges that need to be readable from arm’s length.
- Swappable die sets are practical for small batches requiring multiple sizes, but frequent swapping reduces productivity compared to dedicated single-size presses.
- Regional differences in badge standard sizes can cause incompatibilities, so always check outer cut dimensions and manufacturer specifications.
- Higher durability and comfort are generally found in smaller badges, but larger ones better distribute weight and resist wear, depending on the application.
Table of Contents
- Standard round button and badge sizes explained
- How do badge press dies and moulds actually work?
- Which badge size should you choose for your event or product?
- Preparing artwork and templates for common badge sizes
- SubliBlanks resources for matching machines to blanks
- Badge sizing standards vary more than you’d expect worldwide
- Does badge size affect durability and comfort?
- How should event type and audience shape your badge size choice?
- Supplier perspective: the mistakes we see most often
- Get the right press, dies and blanks in one order
- Sources
Standard round button and badge sizes explained
Every badge press is built around a handful of round diameters, and knowing which one you need before you buy saves you from owning a machine that can’t do the job you actually have.
25mm (roughly 1 inch) is the classic giveaway size. Cheap to produce, easy to pin dozens per hour, and the go-to for trade show freebies, kids’ party favours or fundraising pins where the message is short and the volume is high.
32mm (1.25 inches) sits just above that. It’s the sweet spot for retail merchandise and fan pins, where you want slightly more room for a logo but still want to press hundreds without slowing down.
approximately 37mm is less common on hobby machines but shows up on some European kits. It splits the difference between 32mm and approximately 44mm and suits small lapel badges that need a touch more detail than 25mm allows.
approximately 44mm variants (sometimes listed as 45mm depending on manufacturer) are a popular mid-range choice for charity campaigns, school badges and simple event passes. Text stays legible without needing a huge printed face.
58mm (2.25 inches) is the most popular large button size on the market, and for good reason: it’s the standard for retail promo badges, band merchandise and anything that needs to be read from arm’s length. Product listings for machines like the VEVOR 58mm button maker confirm it’s the default die size bundled with most single-size presses.
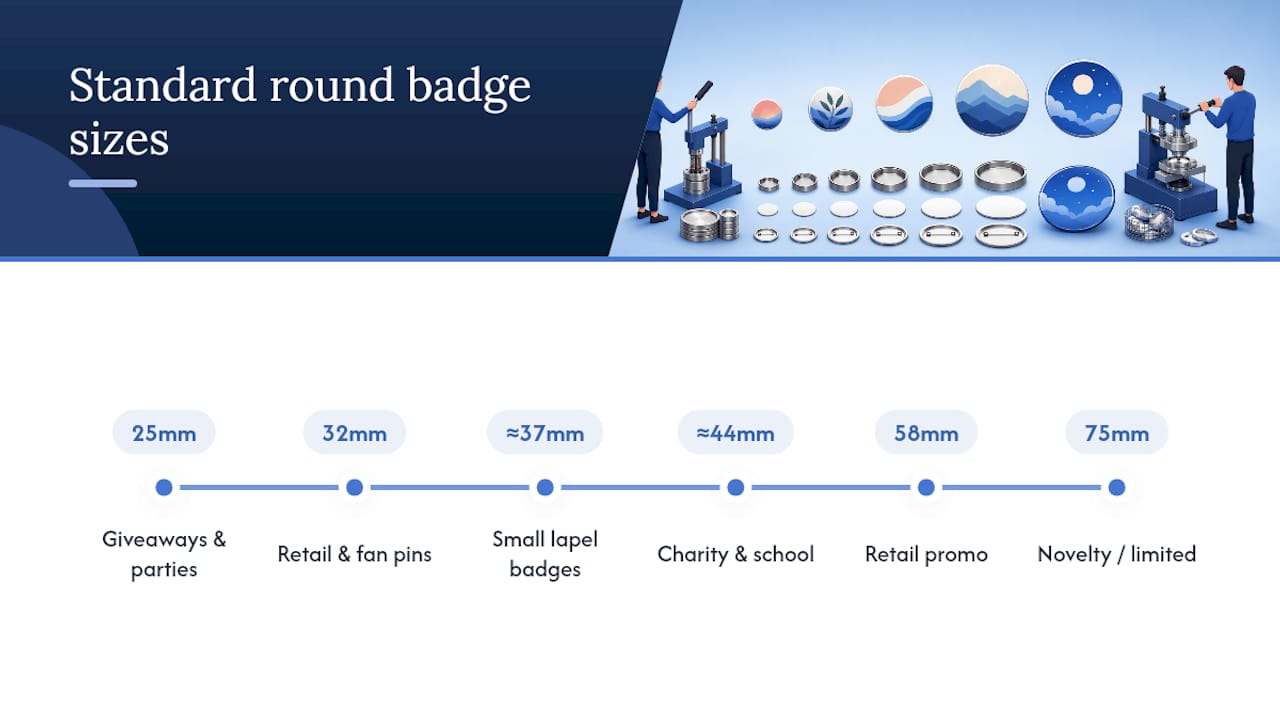
75mm (3 inches) turns up on novelty and collector badges but availability is patchier. Not every supplier stocks blanks at this size, and not every press has a die large enough to punch it, so check before you commit to a design.
Kit bundles matter here too. Many entry-level machines, such as 3-in-1 button maker kits, ship with dies for 25mm, 32mm and 58mm together, which covers most small business needs without buying three separate presses.
How do badge press dies and moulds actually work?
A die set is the metal tooling that cuts, shapes and crimps your badge blank. Every die has two numbers that matter: the face diameter (what the finished badge measures) and the outer cut diameter (the size you actually print and cut your artwork to, before it wraps around the pin back).
The classic example is 58mm. The finished button face reads as 58mm, but the template guide from My Badge Studio specifies a roughly 70mm outer cut line, because the extra material wraps around the curved edge and folds behind the pin assembly. Design to 58mm and your artwork will look cropped once it’s pressed.
Machines split into two camps:
- Single-size presses are built around one die and can’t be resized, which keeps them simple and usually cheaper.
- Multi-die machines accept swappable die sets, so one press can punch 25mm one afternoon and 58mm the next, provided you own the extra tooling.
Practical limits still apply. Swapping dies takes a few minutes of downtime, so if you’re running a high-volume batch, standardising on one die set beats constant changeovers. Cycle rate (how many badges per minute a press can realistically punch) also drops slightly on cheaper multi-die units compared with dedicated single-size machines, because the tooling tolerances are looser.
Pro Tip: Before buying a “multi-size” kit, check whether the listing actually includes the extra dies or just says the machine is “compatible” with them. Plenty of budget listings sell the press alone and charge separately for each additional die set.
Which badge size should you choose for your event or product?
Size choice comes down to four practical factors, in this order of importance:
- Readability. A first name printed below 32pt starts to blur at arm’s length, and conference badge guidance from Badgeflow recommends that minimum as a floor, not a target.
- QR-code scannability. A QR code needs clear space around it to scan reliably. On a 58mm badge that’s tight but workable; on anything smaller, the code competes with the name and logo for room.
- Holder and clip compatibility. Lanyard holders, pin backs and magnetic clips are all sized to specific badges, and ConferenceBadge’s sizing guide points out that mismatching a badge to an undersized holder is one of the most common ordering mistakes.
- Wearer comfort. Bigger isn’t always better once you factor in fabric drag on a lanyard or pin weight on a lapel over a full day.
For quick scenarios: small meetings and workshops rarely need more than a 3×4 inch card badge with a first name in large type. Large conferences with sponsor logos and QR check ins do better on 4×6 inch, which gives room for both without shrinking the name. Retail promo runs favour 58mm buttons for shelf visibility, and staff ID badges usually sit at 32 to approximately 44mm, sized to fit a standard lanyard holder rather than to maximise print area.
Production volume changes the calculus too. If you’re running thousands of badges a week, fewer die swaps means faster turnaround, so picking one or two standard sizes and sticking to them beats chasing a perfect size for every batch.
Preparing artwork and templates for common badge sizes
Every badge template has three layers: the safe zone (where text and logos must stay), the face diameter (the visible finished size), and the outer cut or bleed line (where you actually trim the artwork). Miss any one of these and badges come out cropped, off-centre or with type running off the curved edge.
The 58mm example again is the clearest illustration: design your face artwork at 58mm, but export and print at the roughly 70mm outer cut line so the wrap has enough material to fold cleanly.
Before you press a full batch, run this checklist:
- Set print scaling to exactly 100%, never “fit to page”, which silently rescales artwork.
- Print one test badge at 1:1 and hold it against the physical blank before running the batch.
- Confirm your chosen holder’s insert dimensions match your printed size, not just the die size.
- Design at 300 dpi with a consistent colour profile, and avoid placing critical text in the outer 10% of the face, since it appears visually smaller once the badge curves.
One detail worth flagging: My Badge Studio’s own template notes stress that the wrap allowance isn’t optional guidance, it’s a fixed dimension tied to that specific die, so a template built for one manufacturer’s 58mm die won’t always fit another’s press without checking the spec sheet first.
SubliBlanks resources for matching machines to blanks
Choosing a die size in isolation is guesswork without checking what your press can actually run. Subliblanks’ buyer’s guide to badge making machines breaks down press types and die compatibility in more depth, and the dedicated post on button badge sizes walks through diameter selection in detail. Product pages list exact die and blank specifications, so check those figures against your machine before ordering stock.
Badge sizing standards vary more than you’d expect worldwide
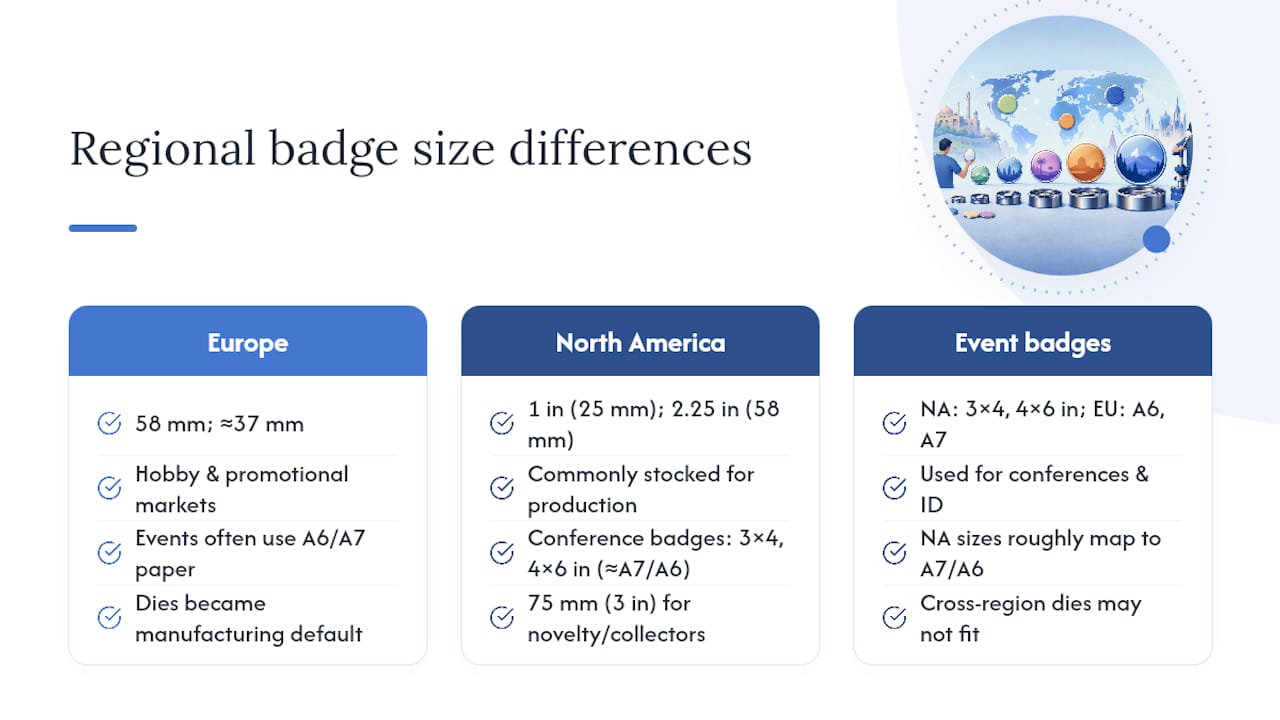
Badge sizing isn’t governed by one global standard, and that catches out a lot of first-time buyers who assume a “58mm badge” means the same thing everywhere. In continental Europe, 58mm and approximately 37mm buttons dominate hobby and promotional markets, largely because those die sizes became the manufacturing default decades ago and stuck. In North America, the 1 inch (25mm) and 2.25 inch (58mm) sizes are the most commonly stocked, with 3 inch (75mm) reserved for novelty items and collector pins rather than everyday production runs.
Event badge conventions diverge even further from button conventions. North American conference badges typically follow the 3×4 inch and 4×6 inch standards, which roughly map to the A7 and A6 paper sizes respectively. European events, by contrast, more often use genuine A6 and A7 paper dimensions directly, since that market already runs on ISO 216 paper standards for printing generally.
The practical consequence: a die or template bought from one region’s supplier may not match a machine or holder bought from another. A 58mm die from a European manufacturer and one from a North American supplier are both nominally “58mm,” but outer cut allowances and blank thickness can differ slightly between manufacturers. If you’re sourcing dies, blanks and presses from different suppliers, cross check the outer cut dimension on the spec sheet rather than assuming the nominal face size guarantees a fit.
Does badge size affect durability and comfort?
Size has a direct, physical effect on both how long a badge lasts and how comfortable it is to wear, and the two often pull in opposite directions.
Smaller badges (25 to 32mm) put less strain on a pin back or clip, which means the fastening point holds up better over repeated use. They also weigh less, so on a lanyard or lapel across an eight-hour shift, they’re barely noticeable. The trade-off is durability of the printed surface itself: smaller badges have less laminate coverage relative to their edge, so heavy handling can start to lift or scuff the edge sooner than on a larger badge with more surface area to absorb wear.
Larger badges (58mm and above) spread weight over a bigger pin back, which actually reduces the risk of the fastening bending or tearing fabric, provided the badge is worn on sturdier clothing like a jacket or lanyard rather than a thin shirt. But the sheer surface area means more exposure to scratches, and a poorly wrapped 58mm button (where the outer cut wasn’t generous enough) is more prone to peeling at the wrap seam over time.
Card event badges behave differently again. A 3×4 inch badge in a rigid plastic holder survives a multi-day conference far better than an unprotected printed badge of the same size, because the holder absorbs the physical wear rather than the badge itself. If you’re planning a long event, the holder matters as much as the badge dimensions.
How should event type and audience shape your badge size choice?
Match the badge to how the audience will actually use it, not just to what looks good on a design mockup.
For small workshops and internal meetings, a compact badge, even down to a 32mm button or a simple 3×4 inch card, does the job. Attendees know each other roughly, and the badge is more of a formality than a functional tool.
For large conferences and trade shows, go bigger. A 4×6 inch badge gives room for a scannable QR code, sponsor branding and a name printed large enough to read from a few feet away, which matters when attendees are networking with strangers all day. ConferenceBadge’s sizing research specifically recommends stepping up to 4×6 when QR codes or sponsor logos need to share space with the attendee’s name.
For retail and consumer-facing promotions, 58mm buttons win on visibility. Shoppers glance at a badge for a second at most, so a larger printed face with bold colour does more work than a small, detailed design.
For staff and volunteer ID, prioritise the holder over the badge. Most organisations already own lanyard clips sized for a standard card, so a 3×4 inch badge that slots into existing stock beats a custom size that needs new holders ordered specially.
Audience demographics matter too. Events skewing toward an older audience benefit from larger type and simpler layouts regardless of badge size, since legibility issues compound with distance and lighting in a crowded hall.
Supplier perspective: the mistakes we see most often
The recurring mistake is picking a badge size before checking the die and holder it needs to fit. Insufficient bleed on 58mm designs is the second most common issue we hear about. The fix is simple: standardise on one or two sizes, test print before a full run, and keep a spare die on hand.
— chris
Get the right press, dies and blanks in one order
Subliblanks is the practical alternative to piecing together a press from one supplier, dies from another, and blanks from a third, hoping the outer cut dimensions actually line up. We stock badge presses, die sets and blank stock together, with no minimum order quantity, so you can buy exactly what a job needs without committing to a pallet of parts you might not reuse.

If you already know your size, check the button badge sizes guide to confirm die and outer cut dimensions before ordering. If you’re still deciding between a single-size press and a multi-die kit, the badge making machines buyer’s guide breaks down which option suits low-volume versus bulk production. When you’re ready, head to the Subliblanks product range to check current die and blank stock, or contact the team directly for bulk pricing or a custom die set that isn’t listed yet.
Sources
- 58mm badge template guide | My Badge Studio
- VEVOR 58mm button maker product page
- Event badge size guide | ClearEvent
- Event badge sizes: how to choose | ConferenceBadge


