


Step by step 3D printing: beginner's guide
TL;DR:
- Beginners often encounter failed 3D prints due to improper bed leveling, filament issues, or unsupported overhangs.
- Starting with PLA filament, slicing with beginner-friendly software, and carefully calibrating the bed significantly enhance success rates.
- Consistent monitoring and incremental adjustments help build confidence, enabling learners to identify and fix common problems efficiently.
Your first 3D print fails. The filament strings across the bed, the edges curl up, and you have no idea what went wrong. Sound familiar? Step by step 3D printing sounds straightforward in theory, yet the gap between pressing print and holding a clean, finished object is where most beginners get stuck. This guide walks you through every stage of the process, from choosing your first printer and setting up slicing software to monitoring the print, troubleshooting failures, and measuring your results. Follow these steps in order, and your learning curve gets a lot shorter.
Table of Contents
- Key takeaways
- What you need before you start
- From 3D model to ready-to-print file
- Monitoring your print and fixing common problems
- Checking results and improving over time
- My honest take on learning 3D printing
- Expand your creative projects with Subliblanks
- FAQ
Key takeaways
| Point | Details |
|---|---|
| Start with the right filament | PLA is forgiving, affordable, and the best material for beginners learning 3D printing basics. |
| Slice before you print | Slicer software converts your 3D model into G-code instructions the printer actually understands. |
| Nail bed levelling first | A correctly levelled bed prevents the majority of failed first layers and warping issues. |
| Change one setting at a time | Adjusting multiple variables simultaneously makes diagnosing print failures nearly impossible. |
| Test prints build confidence | A 20mm calibration cube tells you more about your printer’s accuracy than any manual ever will. |
What you need before you start
Good results begin before you even load the filament. Skipping the preparation stage is the single fastest way to produce frustrating failures before you understand why they happened.
Choosing your first printer
For a beginner 3D printing guide, the best starting point is a Fused Deposition Modelling (FDM) printer. FDM machines melt plastic filament and deposit it layer by layer to build your object. They are affordable, widely supported, and have enormous online communities ready to help when things go wrong. Popular beginner models include the Bambu Lab A1 Mini and the Creality Ender 3 series, both of which offer good print quality without requiring advanced technical knowledge to operate.
Filament, software, and workspace
PLA (Polylactic Acid) is the recommended starting filament for almost every 3D printing tutorial aimed at newcomers. It prints at relatively low temperatures, sticks well to most surfaces, and rarely warps. Once you are comfortable, PETG and ABS open up more durable applications, but PLA is your foundation.
For slicing software, two options dominate the beginner space: UltiMaker Cura and PrusaSlicer. Both are free, both are well-documented, and both offer beginner profiles that take most of the guesswork out of your first few prints. You can build an efficient printing workflow much faster when your software is set up correctly from the start.
| Item | Recommended option | Why it works for beginners |
|---|---|---|
| Printer type | FDM (e.g. Bambu Lab A1 Mini) | Affordable, well-supported, large community |
| Filament | PLA 1.75mm | Low warp, easy to print, forgiving temperatures |
| Slicer software | UltiMaker Cura or PrusaSlicer | Free, beginner profiles, large documentation base |
| Adhesion aid | Glue stick or PEI sheet | Improves bed adhesion, reduces warping |
| Safety | Ventilation and smoke detector | FDM produces fine particles during printing |
- Keep your printing area ventilated. FDM printing produces ultrafine particles.
- Store filament in a sealed bag or dry box to prevent moisture absorption.
- Keep your workspace clear of flammable materials near the printer.
Pro Tip: Buy a small hygrometer and store it with your filament. If humidity rises above 50%, desiccant packets will keep moisture out and stop brittle, snapping filament from ruining your prints.
From 3D model to ready-to-print file
This is where 3D printing basics come alive. You have your printer and your filament. Now you need something to actually print.
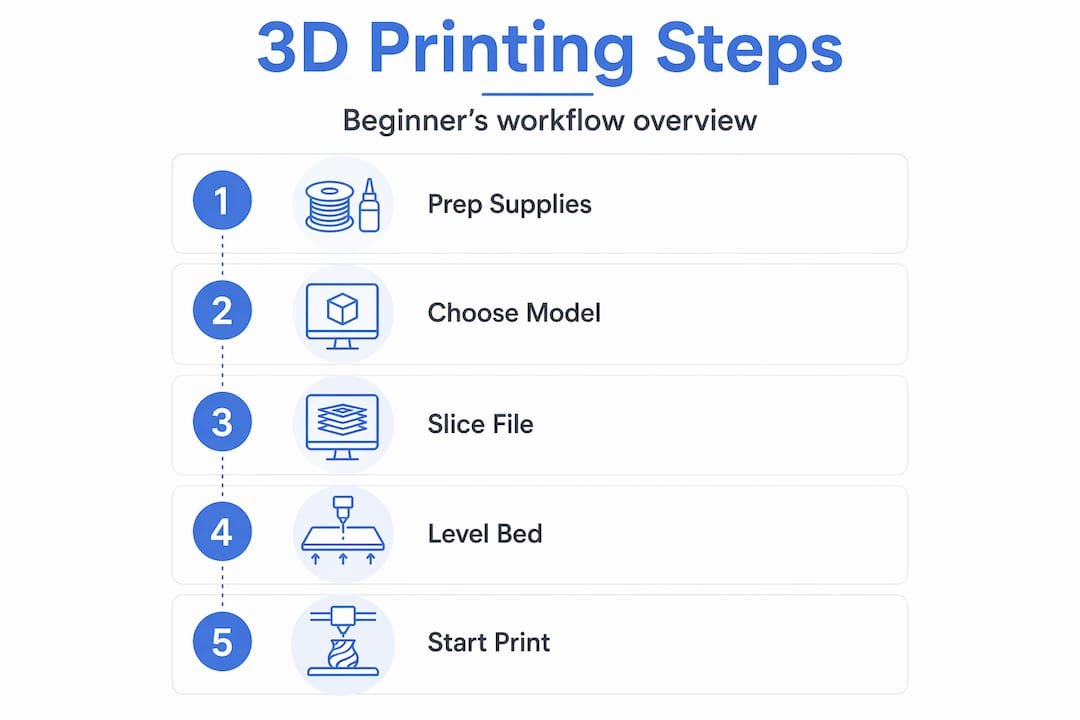
Finding or creating your model
You do not need to design your own models to get started. Websites like Thingiverse and Printables host thousands of free files uploaded by the maker community. Search for something simple: a phone stand, a small box, or a cable clip. Download the file in STL or 3MF format. These are the standard file types that slicer software reads.
Loading and configuring your slicer
Here is the step by step guide to 3D printing inside your slicer software:
- Open your slicer (Cura or PrusaSlicer) and select your printer model from the setup list.
- Import your STL or 3MF file by dragging it into the slicer window.
- Scale and orient your model. Flat surfaces should face the bed for best adhesion. Avoid unnecessary overhangs where possible.
- Set your print profile. Start with a preset “Standard” or “0.2mm” layer height profile. Do not customise settings yet.
- Add supports if your model has overhangs greater than 45 degrees. The slicer generates these automatically.
- Add a brim for better bed adhesion on your first few prints. A brim adds a thin flat border around the base of your model.
- Slice the model. The software converts your design into G-code instructions that the printer reads layer by layer.
- Save the G-code to an SD card or USB drive, or send it directly via USB if your printer supports it.
Preparing your printer
Manual bed levelling uses a piece of paper slid under the nozzle at each corner of the bed. You adjust the corner knobs until the paper drags with slight resistance but still moves. Do this at all four corners and then the centre. It sounds tedious, but a properly levelled bed is the single biggest factor in successful first layers.
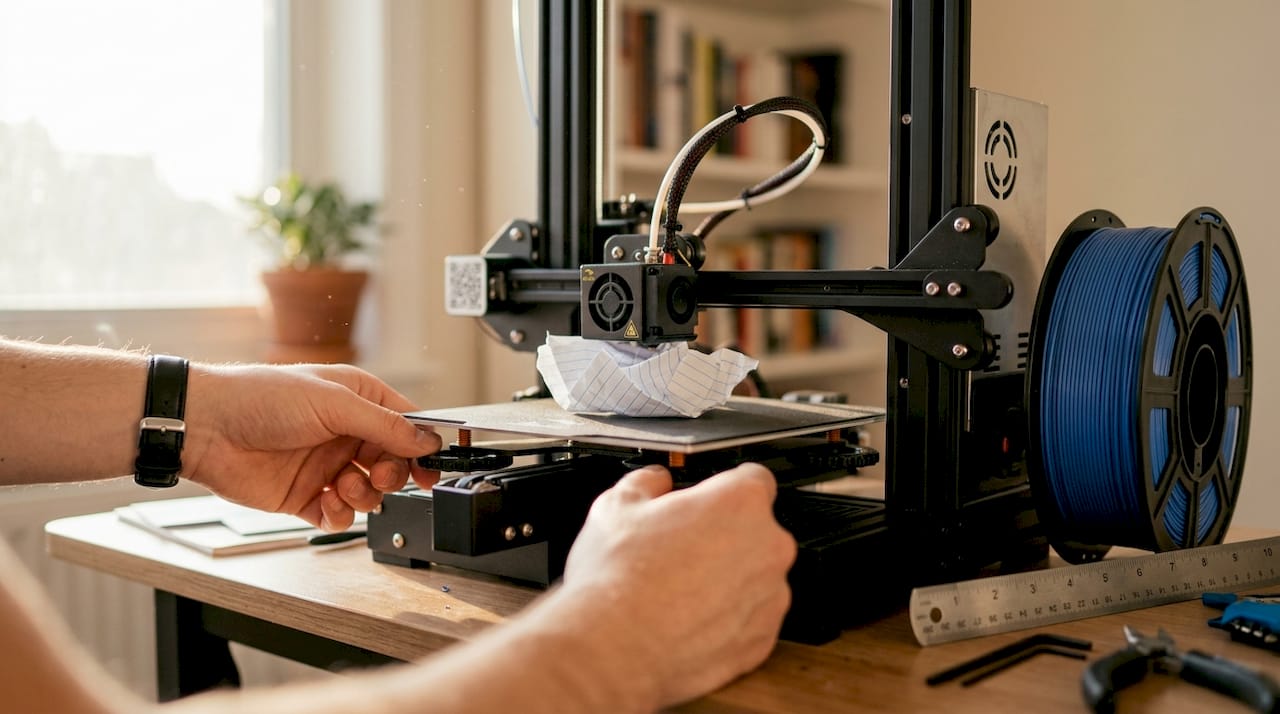
Load your filament by heating the nozzle to the correct temperature for PLA (usually 200°C) and pushing the filament through the extruder until it flows cleanly from the nozzle tip. Purge any old filament colour until the new colour flows consistently.
Pro Tip: Run a test print before your real project. Simple test prints validate your entire setup and catch problems early, saving you hours of wasted filament on a larger job.
Monitoring your print and fixing common problems
The 3D printing process explained in most tutorials often skips the part that matters most: what to do when things go wrong mid-print.
Watching the first layer
The first layer tells you everything. Watch it closely. The filament should bond flat to the bed with no gaps and no squishing so hard that the nozzle scrapes the surface. If the filament lifts off the bed or strings randomly, stop the print and re-level the bed. Do not let a bad first layer continue in hope that it improves.
Warping occurs when edges curl up due to rapid cooling or poor adhesion. A brim and a glue stick on the bed surface solve this in most PLA cases. If warping persists, lower your fan speed slightly for the first few layers.
Common failures and what to do
- Stringing: Fine threads of plastic between parts of the print. Fix by adjusting retraction settings in your slicer. Retraction pulls the filament back into the nozzle during travel moves, preventing unwanted oozing.
- Layer shifting: Layers print misaligned horizontally. Usually caused by a loose belt or printing too fast. Tighten the belt and reduce print speed by 10mm/s.
- Under extrusion: Gaps or weak layers in the print. Check your filament path for tangles, and verify your nozzle temperature is correct for the material.
- Elephant foot: The bottom layers squash outward. Raise the Z-offset slightly to increase the gap between the nozzle and the bed.
The golden rule across every 3D printing tips and tricks resource you will find: change only one variable at a time. Changing temperature, speed, and retraction simultaneously makes it impossible to know which adjustment fixed the problem.
Write down every setting change and its result in a notebook or a simple spreadsheet. After ten prints, you will have a personal troubleshooting guide that is more useful than any generic forum post.
Pro Tip: Follow this calibration order for best results: bed levelling and Z offset first, then extrusion baseline (E steps), then flow adjustment. Skipping ahead causes confusion.
Safety during printing
Never leave your printer completely unattended for long jobs. Keep a smoke detector nearby and do not print with materials like ABS in an unventilated room. FDM printing is safe for most home environments with PLA, but basic precautions matter.
Checking results and improving over time
A finished print is not the end of the learning process. It is where the useful analysis begins.
Measuring for accuracy
Print a 20mm calibration cube and measure each dimension with digital calipers. Measurements should fall within ±0.2mm of the target 20mm. If your cube measures 19.6mm consistently, your printer needs extrusion calibration. The E steps (the number of motor steps needed to push 1mm of filament) and your flow adjustment are calibrated separately for best accuracy.
Evaluating surface quality
Run your fingers across the surface. You should feel smooth, uniform layers. Rough or bumpy surfaces suggest over or under extrusion, or a layer height that does not suit the model’s geometry. Look at overhangs. If they droop, add supports or rotate the model in the slicer before reprinting.
Post-processing basics
- Remove supports carefully with flush cutters or needle-nose pliers.
- Sand surfaces with 120 then 240 grit sandpaper for a smoother finish on display pieces.
- Fill layer lines with a thin coat of filler primer if you plan to paint the object.
Planning your next projects
- Phone stand
- Cable clips
- Small storage boxes
- Keychain tags
- Plant pot drainage inserts
Start small, finish the print, measure it, and note what worked. Incremental learning through small prints builds genuine understanding far faster than jumping straight into complex multi-part models. When you are comfortable with your printer’s behaviour, explore how 3D printing benefits small businesses and hobbyists alike, opening doors to custom products and prototyping.
My honest take on learning 3D printing
I have watched a lot of beginners give up on 3D printing not because it is too hard, but because they tried to fix everything at once. They change temperature, retraction, speed, and bed adhesion in one session, then have absolutely no idea which change did anything useful. When the next print fails, they are further from understanding the problem than when they started.
What I have found actually works is the opposite of what most people do. Start with one printer profile and do not touch it for your first five prints. Let the failures happen. Look at them closely. A stringy print and a warped print are telling you completely different things, and learning to read those signals is the real skill being built here.
My strongest advice: print the calibration cube first. Every time. It is not glamorous, but understanding the basics of how your specific machine behaves is worth more than any tutorial. The cube tells you in ten minutes what would otherwise take weeks of guesswork. Patience is not just a virtue in 3D printing. It is the technique.
— chris
Expand your creative projects with Subliblanks

Once your 3D printing skills are building, you will likely find yourself drawn to other making techniques that complement the hobby beautifully. Subliblanks supplies everything a UK hobbyist or small trade buyer needs to expand their creative output, with no minimum order quantities and a product range that goes well beyond one craft. Our MDF name badges with pin and our round magnet badges are popular with makers who combine sublimation printing with 3D printed accessories for markets and events. Whether you are after sublimation blanks, DTF supplies, or laser-engraveable materials, explore the full range at Subliblanks and order exactly what you need, when you need it.
FAQ
What filament should a beginner use for 3D printing?
PLA filament is the best starting material for beginners. It prints at low temperatures, rarely warps, and is widely available in a range of colours.
What is G-code and why does it matter?
G-code is the set of instructions your printer reads to build your object layer by layer. Slicer software generates it automatically from your STL or 3MF file.
How do I stop my prints from warping?
Apply a glue stick to your print bed, add a brim in your slicer settings, and use brims or adhesives to improve bed adhesion. Reducing cooling fan speed on the first few layers also helps.
How do I know if my printer is calibrated correctly?
Print a 20mm calibration cube and measure each side with calipers. Readings within ±0.2mm confirm good calibration. Consistent deviation means you need to adjust E steps or flow settings.
How often should I level the print bed?
Level your bed before any new filament type, after moving the printer, and whenever your first layers look inconsistent. Many printers benefit from a quick check every five to ten prints.


